Tag: Utah

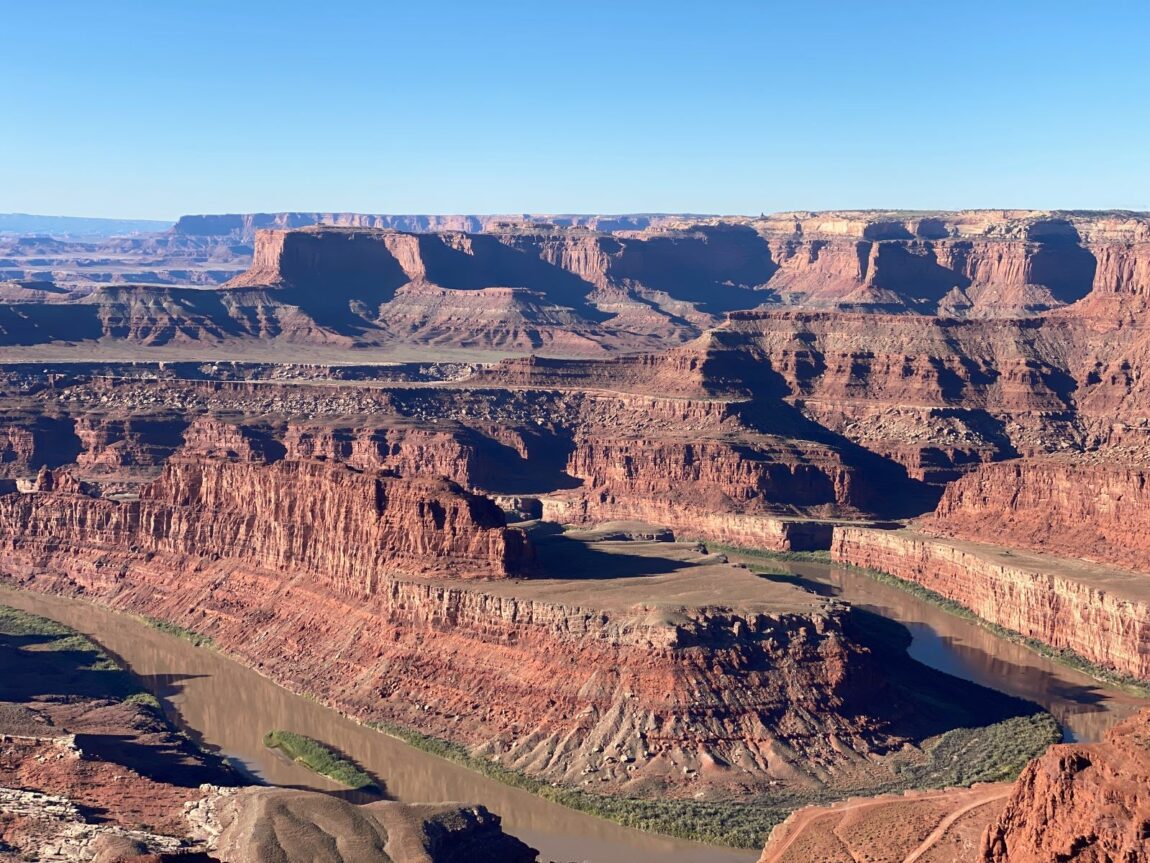
Dead Horse Point State Park, UT. Credit: Carolina Valenzuela

Dead Horse Point State Park, UT: Tips, photo spots, and hiking trails

Spoiler alert: The view of the Dead Horse Point Overlook is unbeatable!

When visiting Moab, do not miss the chance to visit Dead Horse Point State Park in Utah, especially since it is so close. In addition to offering several hiking trails to choose from, the park provides amazing views of the surroundings. Located 2,000 feet directly above the Colorado River, Dead Horse Point State Park will give you the opportunity to enjoy beautiful vistas of Moab, La Sal mountains and the Colorado River below – all in one!

Quick facts

  • Park elevation: 5,900 feet
  • Driving distance from Moab: 32 miles
  • Entrance fee: $20. Note that if you have the US National Park pass it won’t be valid since this is a state park.
  • Opening hours: 6:00 a.m. until 10:00 p.m. daily
  • When to visit: During spring and fall temperatures can range between 70 and 80 degrees which is an ideal temperature if you are planning to visit the park and do a few hikes. In summer however, temperatures can go up to over 100 degrees and dip into the 20s in winter. If you are planning to visit the park either in winter or summer, make sure you wear appropriate clothing. We recommend you get in early to see one of the most spectacular sunrises.
Dead Horse Point State Park, UT. Credit: Carolina Valenzuela

The legend of Dead Horse Point State Park

For several decades, there have been legends and myths surrounding the Dead Horse Point State Park, including tales of ghostly horses and cruel cowboys. There is one legend that stands out:

Wranglers would drive herds of wild horses across the points narrow bottleneck to corral them by the cliffside. For reasons we still don’t know, one day the wranglers decided to take the best horses and corral the others on the point – and closed the neck. Trapped and with no way out, the remaining horses starved to death. Later when their remains were found by others, this ghastly grave site was given the name Dead Horse Point.

Hiking trails

There are several hiking trails to choose, ranging from short easy hikes to the longer hike around the park. We ended up doing the longer trail, as it provided amazing overlooks and took up the majority of the morning.

Dead Horse Point State Park, UT. Credit: Carolina Valenzuela

Visitor Center Trail: This is a really easy and short trail -only 1/8 of a mile round trip- located outside the park’s visitor center. It’s a paved road that offers fantastic views of the basin, La Sal Mountains along with Chimney Rock. Take a picture here with the sunrise as the mountains give a purple foreground to the orange sky.

Dead Horse Point Overlook: If you are pressed for time and you can do only one thing at the park, you should head to the Dead Horse Point Overlook which is by far the most photogenic spot of the entire park. You can access this overlook by driving the main road or by hiking from either the East Rim Trail or West Rim Trail. We started at the visitor center and walked the West Rim the entire time (it was the best view in our opinion). The overlook from Dead Horse Point looks down 2,000 feet to the Colorado River surrounded by the rusty sandstone of Canyonlands; depending on the time of day you’ll get different colors dancing across the canyon. Make sure to walk around here as you will encounter other viewpoints worth photographing – watch out for signs that point the way.

The West Rim Trail: The hike is 7 miles round trip so it will take you a few hours to complete. Christian and I decided to hike the West Rim Trail because it provides amazing views the entire way as you are walking along the edge of the canyon. This hike is not very hard, it is just quite long so make sure you are wearing the appropriate gear and stay hydrated. The trail is mainly flat but there is hardly any shade so protect yourself from the sun and heat.

Once you get to the visitor center, you may have to cross the road and start following the trail. Cairns will guide the way so keep an eye out for them to stay on the trails. Overall, it was easy to find them but a few times Christian and I were wondering if we were on the correct trail! Make sure you walk the additional 0.25 mile to the Meander, Shafer and Rim overlooks (1 mile in total) to get amazing views of the canyon.

IMG 5413 edited IMG 5422 edited PS
IMG 5441 edited PS IMG 5403 edited PS

Bighorn Overlook Trail: This is a 1.5-mile one-way trail marked as a moderate. This trail gets its name because of a fin that when looked in the distance resembles a pair of horns. This trail is the longest spur off the West Rim Trail; it is also relatively isolated from the remainder of the park so we decided to skip it. From what we have seen in pictures the view looks quite nice, so we definitely have something to do the next time we visit the park. Note that during the trail you will encounter sections where there is some cliff exposure so watch your step.

East Rim Trail: This trail is between 1.5-2 miles one way and rated as easy. If you want to reach the Basin Overlook add 0.25 additional miles. The East Rim Trail starts at the visitor center and follows the eastern side of the mesa top to Dead Horse Point. The trail is mainly flat aside from a hill of a quarter mile from the visitor center. If you’d like you can combine both the West and East Rim trails in one visit. We decided to stick to the West Rim Trail for the entire hike because we were blown away by the views.

Read blog: Hiking trails in Arches National Park: Top 4 must do

What you should bring along

Sturdy footwear: Even though most of the trails mentioned above are flat, keep in mind that if it rains the terrain can get slippery so footwear with good traction is essential. We recommend The North Face Men’s Trail Escape Edge and the Oboz Sawtooth II Low B-Dry Hiking Shoe for women.

Sun protection: These include a hat and sunscreen both for your face and your body – especially if you are visiting the park during the summer months. I love Supergoop! for my face as it is scentless and you will not notice you have sunscreen on! For your body, get Coppertone.

Water: Hiking will make you thirsty. Bring water along to stay hydrated along the way. We recommend getting the Nomader Collapsible Water Bottle which rolls up for compact travel and can be attached to your bag for quick and easy access.

We are part of several affiliate programs including Viator and Amazon which means that we will earn a small commission at no extra cost to you if you make a purchase through the links included in this post.

Arches National Park. Credit: Carolina Valenzuela

Arches National Park photography tips

Learn when you should visit the most famous arches to get the best pictures.

If you love photography, Arches National Park provides an amazing backdrop for pictures – it’s no wonder this is among America’s most popular national park. Arches, fins and spires will give you plenty of opportunities to make your camera work extra hard during your trip. Be ready to have some of nature’s most memorable landscapes captured forever on film.

How do you take pictures of Arches National Park?

If you always look for the “perfect” picture, note that the sun can be either your best friend or worst enemy, especially at this park. The sunlight can either help you take an amazing picture that captures the bright, fiery red and orange colors of the arches or totally ruin it. Therefore, there are specific times when you should visit the arches to use the sunlight to your advantage.

Below is a list of the most popular arches as well as some photography tips. Neither Christian nor I are professional photographers – we usually take pictures with our iPhones; which if you ask me, take amazing pictures. However, we hope these tips are beneficial and help you take the best photo possible. Keep in mind that the pictures on this blog have not been Photoshopped – the colors depicted are real!

Balanced Rock

IMG 5133 resized IMG 5141 edited

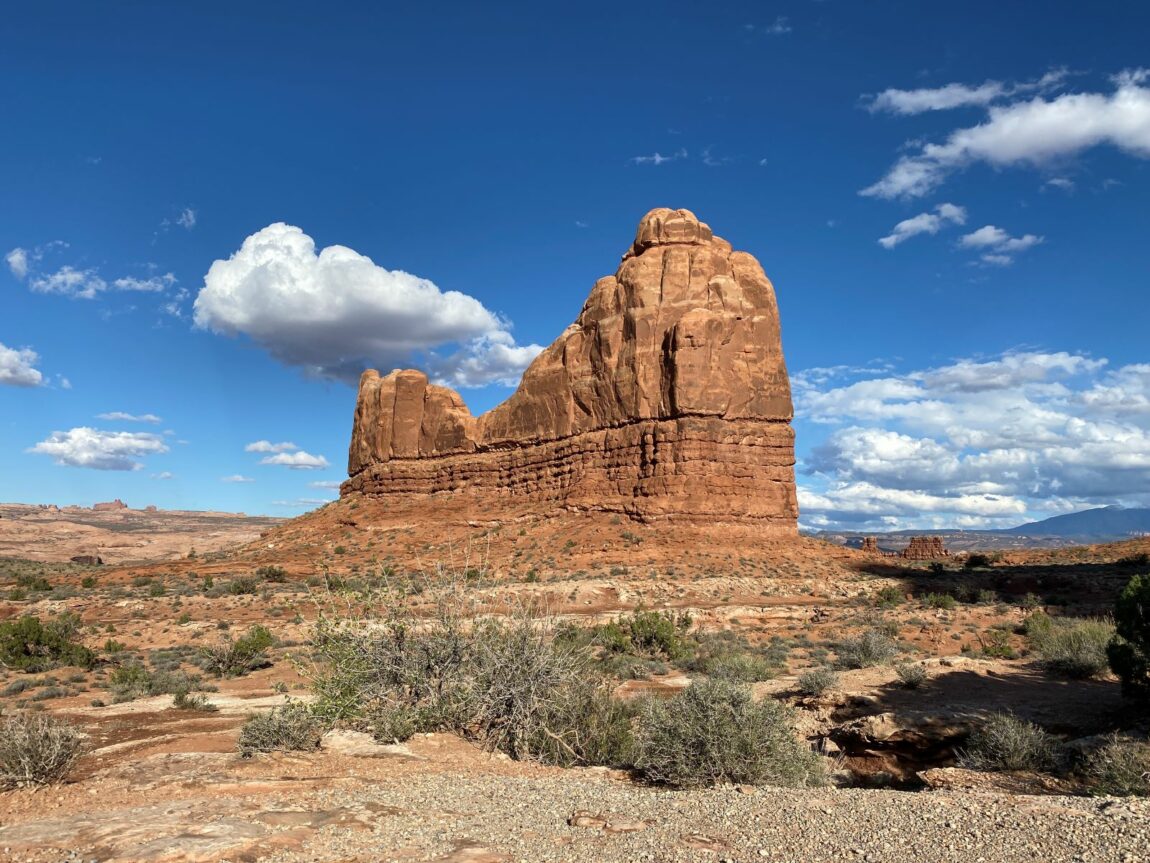
Balanced rock defies gravity. Located in an accessible and paved trail, visiting this arch is a must-do when in Arches. The total height of Balanced Rock is 128 feet (39 meters) and resting on a tiny sliver of rock which will eventually collapse with the passage of time.

The 0.3 miles trail (approximately a 15-minute walk) will take you around this amazing rock formation. Take this opportunity to capture Balanced Rock from different perspectives and angles as you walk on the trail. Note that climbing on Balanced Rock or its base is prohibited.

The best time to photograph Balanced Rock is in the afternoon.


Delicate Arch

IMG 5506 edited IMG 5481 edited

Delicate Arch is the most famous of the 2,000 arches in the park so you should definitely plan a visit. Unlike Balanced Rock, which is really easy to get to, Delicate Arch requires a bit more effort from your part.

Get ready to hike for 3 miles (4.8 kilometers) roundtrip and climb 480 ft (146 m). On average the hike to Delicate Arch can take you anytime between 2-3 hours.

During the afternoon, the sun will cast a warm light over the arch. Make sure to bring a headlamp with you to help you go back if it’s already dark. Sunrise is another popular time to visit Delicate Arch. However, you might need to wake up extremely early if you want to make it to the arch on time – plan accordingly.

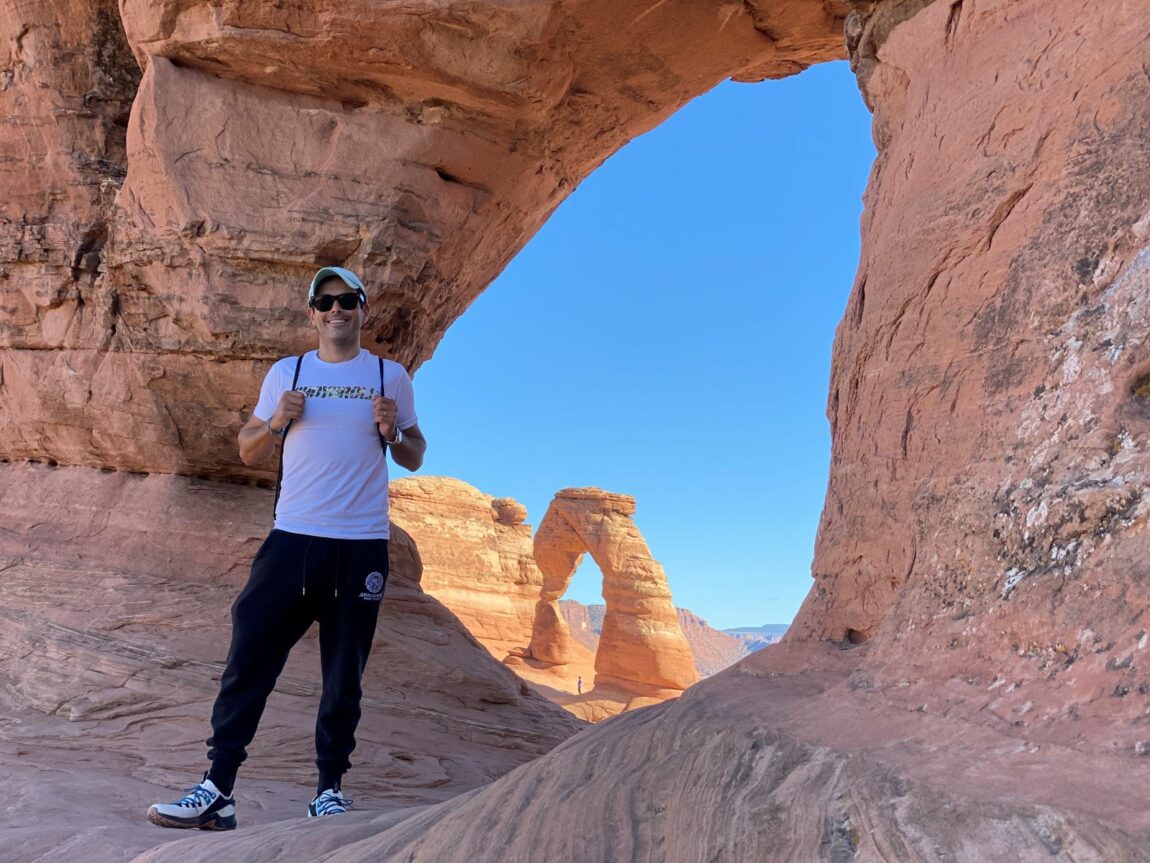
Just before turning right to encounter Delicate Arch look for an opening called the Twisted Doughnut. You will find it because there will be people next to it snapping pictures. The Twisted Doughnut gives you a perfect frame to photograph Delicate Arch so don’t miss this opportunity. Additionally, once you get to Delicate Arch, there are different angles to photograph it. Get close to it, go around, and take some time taking in the amazing scenery all around.

The best time to visit Delicate Arch is in the afternoon.

Read blog: Delicate Arch in Moab: Things you should know for an unforgettable hike

The Windows & Turret Arch

IMG 5575 resized IMG 5205 resized

The Windows is considered among the most scenic locations in Arches National Park. The trail to The Windows and Turret Arch is 1-mile roundtrip (1.6 kms) and it can take you between 30-60 minutes.

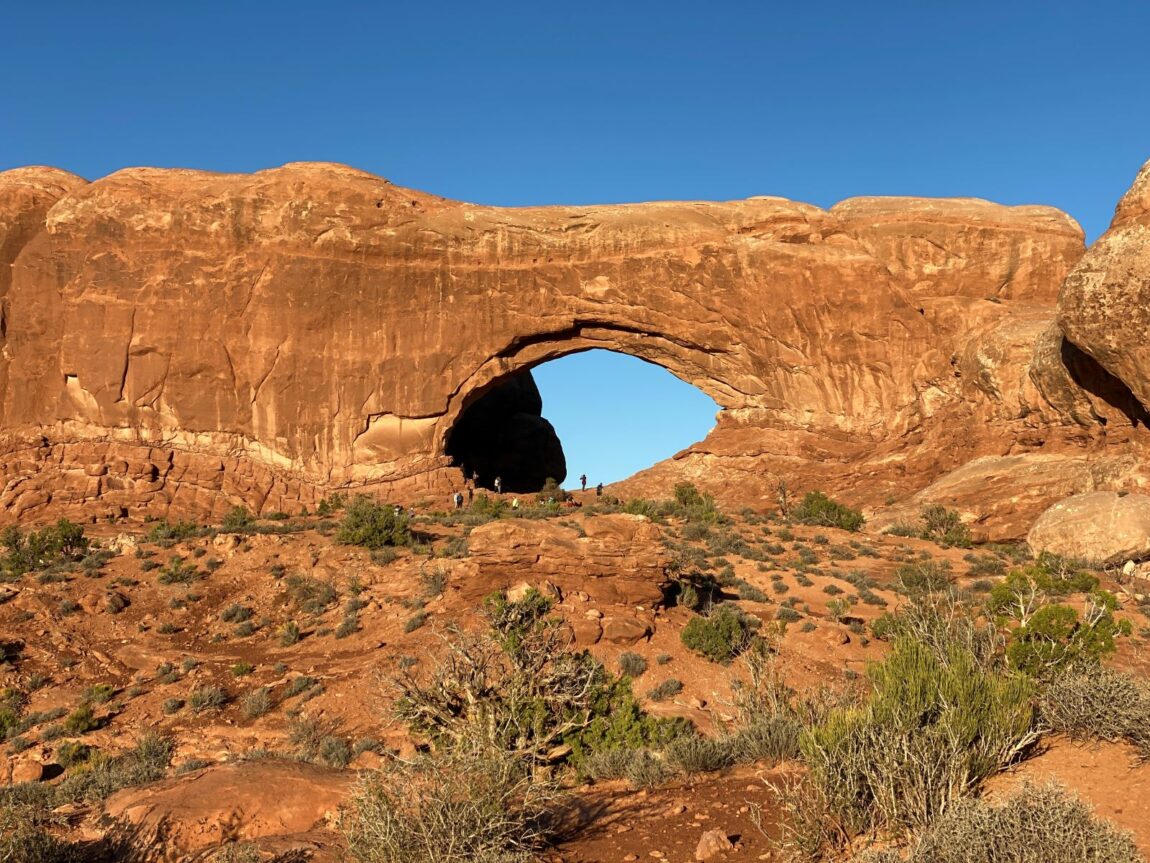
When visiting the North Window, try photographing Turret Arch from the opening in this arch. Getting to this photo spot wasn’t easy for me as I got scared, but there were plenty of people photographing Turret Arch from here and seemingly had no issues at all. If you decide to head to this spot, be very careful.

The best time to photograph The Windows is during the afternoon, as the sun won’t give you much trouble.

Keep in mind this is a popular location and the parking lot might fill in faster than you’d expect.

The best time to photograph Turret Arch is during the morning – contrary to The Windows.

Therefore, if you want to take pictures without the sun casting bad lighting you should head to this location twice, both in the morning and afternoon.

Read blog: The Windows in Arches National Park: Hiking tips, trail info, and best photo spots

Double Arch

IMG 5627 resized IMG 5629 resized

When visiting The Windows, make sure to head over to Double Arch since it’s located really close by. As you can probably guess by the name, Double Arch is composed of two arches that share the same foundation; giving you one of the most unique formations in the park.

The Double Arch trail is easy – no elevation and the total roundtrip distance is only 0.5 miles (0.8 kms). A piece of cake compared to the Delicate Arch trail.

This arch is a bit difficult to photograph as the shadows cast by its two arches pose a bit of a challenge. Make sure you do photograph it from below so you can capture the enormity of Double Arch; but there are other cool angles you’ll spot as well. The larger opening has a span of roughly 144 feet (49 meters), the third longest in the park and a height of 112 feet (33 meters), the highest in Arches.

The best time to photograph Double Arch is in the morning.

Devils Garden Trail Arches

IMG 4977 edited IMG 4770 edited

The Devils Garden Trail was my favorite in the whole park; it was also the most exhausting! To get to this trail, you’ll first need to drive 8 miles north of the entrance which takes approximately 45 minutes. Once you park, get ready for a long hike. The trail is 7.8 miles (12.6 kms) roundtrip and can take you 4:30 hours.

Because this trail is really long and you will probably do it only once, we recommend you visit it during the morning. And by morning, I mean really early. This is a very popular trail, and the parking lot might be full if you arrive mid-morning.

When you get to the trail, the first two arches you should visit are Pine Tree Arch and Tunnel Arch. To do this you’ll need to take short detour (0.5 miles roundtrip) which we highly recommend you do. When we did this part of the trail, we arrived with really good light for photographs. Make sure you “play” with the light as it makes a difference in capturing the bright color of the arches.

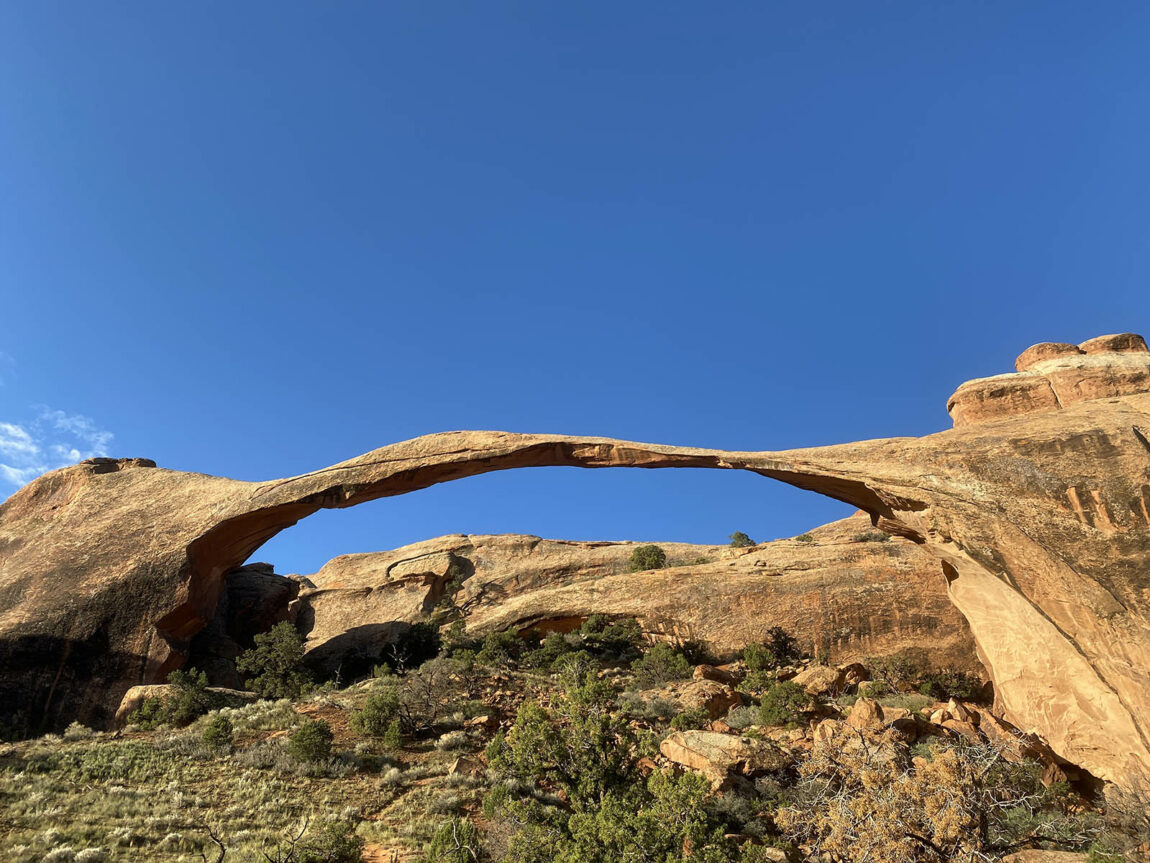
Next, head to Landscape Arch. This was among my favorite arches. Once you first see it, you will immediately want to snap a lot of pictures. However, as you get close to the arch you will notice that the opening is better captured as you continue walking on the trail.

Once you are done, take another detour to Navajo Arch and Partition Arch. This will add 0.8 miles (1.3 km). I wanted to photograph Navajo Arch’s opening from the inside – where I thought it would have looked more photogenic. Unfortunately, the sun ruined this picture. Partition Arch is stunningly beautiful; take advantage of the openings as picture frames.

The next section of the trail was, in my opinion, one of the most photogenic. With fins and spires protruding from almost everywhere, you’ll be able to take memorable photos. Keep walking until you get to Double O Arch. We had a lot of trouble photographing this arch because, again, of the sun. We took pictures from both sides but all of the pictures end up looking a bit “burned out”.

The last stop is Dark Angel, a sandstone “tower” located 0.5 a mile to the northwest of Double O Arch. If you are too tired (and remember you still have to walk back) don’t walk all the way to Dark Angel, you can still take a great picture from a distance.

Best time to visit the Devils Garden Trail is in the early morning.

Devils Garden Trail in Arches National Park: The best hike in the park

Sand Dune Arch

IMG 5653 edited IMG 5649 edited

A secluded arch, Sand Dune is tucked among sandstone fins – half the fun is finding it. It’s only 0.3 miles roundtrip (0.5 km) so you can just stop here for a quick visit. When taking the picture, make sure you include a little bit of sky in the frame as it will make a good contrast with the color of the arch.

The best time to photograph Sand Dune Arch is in the morning.

Park Avenue

IMG 5112 edited IMG 5076 resized

Park Avenue is a really nice one-mile trail (1.6 km) which leads to the Courthouse Towers. Park Avenue gives you the chance to follow the bottom of a canyon and enjoy marvelous views of fins, balanced rocks and monoliths. From this vantage point it really looks like you are surrounded by skyscrapers.

We found Park Avenue a bit difficult to photograph because of the shadows cast by the sun. However, be mindful that while you get great pictures towards one side the opposite side will make your photographs look a bit dark. Here you will be able to also photograph the Three Gossips and the Courthouse Towers. The Three Gossips are better photographed in the afternoon.

The best time to photograph Park Avenue is in the afternoon.

We are part of several affiliate programs including Viator and Amazon which means that we will earn a small commission at no extra cost to you if you make a purchase through the links included in this post.

Landscape Arch in Arches National Park, Utah. Credit: Carolina Valenzuela

Hiking trails in Arches National Park: Top 4 must do

Our favorite 4 hiking trails.

Arches National Park is paradise for hikers. With so many trails to explore, the park offers plenty of opportunities to hike jaw-dropping trails with amazing landscapes all around. On this blog, we have compiled a list of our 4 favorite trails you need to explore when visiting Arches.

1-Devils Garden Trail

This trail is, by far, the best hike in Arches National Park. If you are short on time and you can only do one hike, this is the one to choose. The hike is spectacular all around, but the best part about this trail is that it features several arches, spires, and fins throughout the entire trek. Trust me, you will not want to put your camera away!

IMG 4947 edited IMG 4689
IMG 5006 edited IMG 4870 edited

Distance: A word of caution: this is not an easy hike – it’s actually quite challenging. It’s 7.9 miles (12.6 km) roundtrip and you will encounter uneven surfaces, rock scrambling and steep exposures. It took Christian and I, over 4 hours to complete. Having said that, I would do it again and again, since the landscape is simply breathtaking. Below is a summary of the distance it takes to get to each of the arches. If you have the stamina get all the way to Dark Angel so that you don’t miss anything.

  • Landscape Arch and back: 1.9 miles (3.1 km)
  • Trails to Pine Tree and Tunnel Arches: Add 0.5 miles (0.8 km)
  • Double O Arch and back: 4.1 miles (6.6 km)
  • Trails to Navajo and Partition Arches: Add 0.8 miles (1.3 km)
  • Dark Angel and back via main trail: 4.9 miles (7.9 km)
  • Dark Angel; return via Primitive Trail: 6.6 miles (10.6 km)

Total distance: 7.9 miles (12.6 km)

Best time to hike the Devil Garden Trail: As you can imagine, this is the most popular trail, and the parking lot can get packed quickly. Therefore, head to the trail early in the morning. Additionally, the morning light is the best for taking pictures of most of the arches. If you can, try to get there around 7:30 am so you also avoid the worst sun.

How to get there: If you are planning to arrive to the trail so early, note that the Devil Garden Trail is located at the end of the park road. It’s a 45 minute drive from the entrance of the park. Note that this time can significantly increase if there is traffic – which there will be if you head to the park during peak hours.

Read blog: Devils garden trail in Arches National Park: The best hike in the park

2-Delicate Arch

Delicate Arch is the largest free-standing arch in the park, by far the most iconic (it can be found on license plates across Utah) and was our 2nd favorite trail. I recommend that you don’t combine it with the Devils Garden Trail on the same day as it will be too much (unless you are extremely fit!).

Distance: The hike is 3 miles (or 4.8 km) roundtrip and has an elevation of 480 ft (146 m). Overall the hike can take you any time between 2-3 hours. Of course, this will depend on the number of breaks you take throughout the hike and how long you stay when you reach Delicate Arch.

Best time to hike Delicate Arch: Photographers prefer to head to Delicate Arch in the afternoon where the sun cast a light directly on the arch. If you do this, make sure you are adequately prepared to go back in the darkness and bring a headlamp with you. This is also one of the best places to take night photos of the Arch backdropped by the constellations and Milky Way.

IMG 5506 edited IMG 5481 edited
IMG 5495 edited IMG 5473 edited

How to get there and parking info: Drive 11.7 miles north into the park on the main road and look for the right-hand turn to Delicate Arch and Wolfe Ranch. After this turn, drive 1.2 miles until you reach the parking lot. Remember this is a VERY popular hike and you might have trouble finding parking – especially during the weekend.

The trail: The first part of the trail is relatively flat. However, don’t get too excited, since a steep ascent will follow after passing the Wolfe Cabin. This is the most challenging part of the whole hike, so hang in there. You will probably be accompanied by several people during the hike, so it won’t be easy to get lost.

Once you reach the top, you will be exposed to heights but nothing too intimidating. Make sure you look for the Twisted Doughnut – a small opening where you can take a really cool picture of Delicate Arch. You won’t see it from the trail as you will need to climb up some rocks to reach it. However, there will be quite a few people next to it so it’s easy to spot it. After taking the picture, turn to the right to find the amazing Delicate Arch and enjoy the view. On the way back stop by the ancient pictographs of a hunt made by the Utes.

Read blog: Delicate Arch in Moab: Things you should know for an unforgettable hike

3-The Windows

The Windows section of Arches National Park is also worth visiting as there are a few arches concentrated in a small perimeter. Here you will be able to explore: The North and South Windows, Turret Arch, and Double Arch. Fortunately, this trail is much easier than the Devil Garden Trail and Delicate Arch.

Distance: The trail to visit The Windows and Turret Arch is only a 1-mile roundtrip (1.6 km) and it can take between 30-60 minutes. When you get to the trail, the first 100 yards are mostly flat, but you might encounter some stone steps and uneven surfaces along the way – nothing too difficult though.

Parking: Finding a spot to park at The Windows might be a challenge as this stop gets really crowded – especially during peak hours. I recommend you either head to The Windows early in the morning or alternatively park in the Double Arch parking lot which is relatively close to The Windows.

Location: Getting to The Windows is really easy: You need to drive a bit more than 9.2 miles up from the park’s entrance, then take the first right after Balanced Rock and follow this road for 2.7 miles.

When visiting The Windows don’t forget to take a photograph of Turret Arch framed by the North Window – it’s a fantastic photo opportunity. In my opinion, it was a bit scary to get to the photo spot (the trail goes right along the edge of a cliff and can be quite slippery) but there were plenty of people feeling adventurous and trying to get the perfect picture of Turret Arch.

IMG 5205 resized IMG 5575 resized
IMG 5629 resized IMG 5195 edited

Turret Arch: Once you get your picture, head to Turret Arch located a short distance away from The Windows. Its shape resembles a tower, and you will have fun exploring the arch.

Double Arch Trail: After visiting Turret Arch head to the last spot at The Windows, the Double Arch Trail. It’s an easy hike of ½ a mile (0.8 km) with hardly any elevation. Double Arch opening is the third longest in the park and is the highest in Arches -112 feet (33 meters). As you probably guessed from its name, this arch is composed of two arches that share the same foundation.

Before you leave, don’t forget to look to your left and spot the Parade of Elephants – rock formations which resemble a herd of elephants holding each other’s tails. Really impressive if you ask me!

Read blog: The Windows in Arches National Park: Hiking tips, trail info, and best photo spots

4-Park Avenue

Park Avenue is another trail that you don’t want to miss while in Arches. Not sure why we hardly encountered any hikers when we visited this trail – but it was awesome to have it almost all to ourselves. The whole hike looked like a stroll through 5th avenue in New York or the Magnificent Mile in Chicago – the rock formations looked like skyscrapers along the trail!

IMG 5076 resized IMG 5112 edited
IMG 5096 edited IMG 5103 scaled

Distance: Park Avenue is a one-mile trail (1.6 km) leading to the Courthouse Towers. Here you will follow the bottom of a canyon and there is an elevation gain of 320 feet (98 mts). Get ready to marvel at fins, balanced rocks and monoliths along the way. The hike suggested by the park is to begin at one end and then be picked up by a driver at the other end. If you are doing the round trip hike it is recommended to return on the park trail instead of walking along the main road.

Parking: Park your car in the parking lot, then look for a small landing with stairs located to the left.

Tips for these hikes:


Bring plenty of water with you – especially if you are hiking the Devils Garden Trail. We recommend you get the Nomander BPA free collapsible bottle and fill it in at your hotel before heading to Arches. Being well-hydrated is essential – particularly during summer.

Make sure you have comfortable footwear: When walking for so many miles the last thing you want to have is pain on your feet during the hike. Therefore, bring appropriate hiking shoes and make sure to use them a few times if you are buying brand new shoes. We recommend The North Face Men’s Trail Escape Edge and the Oboz Sawtooth II Low B-Dry Hiking Shoe for women.

Wear sunscreen and bring a hat: This is essential as you will be spending several hours of the day in the outdoors. Bring your sunscreen with you and re-apply every two hours. I love Supergoop! for my face as its light texture makes me feel like I am not wearing something heavy. For your body, get Coppertone.

We are part of several affiliate programs including Viator and Amazon which means that we will earn a small commission at no extra cost to you if you make a purchase through the links included in this post.

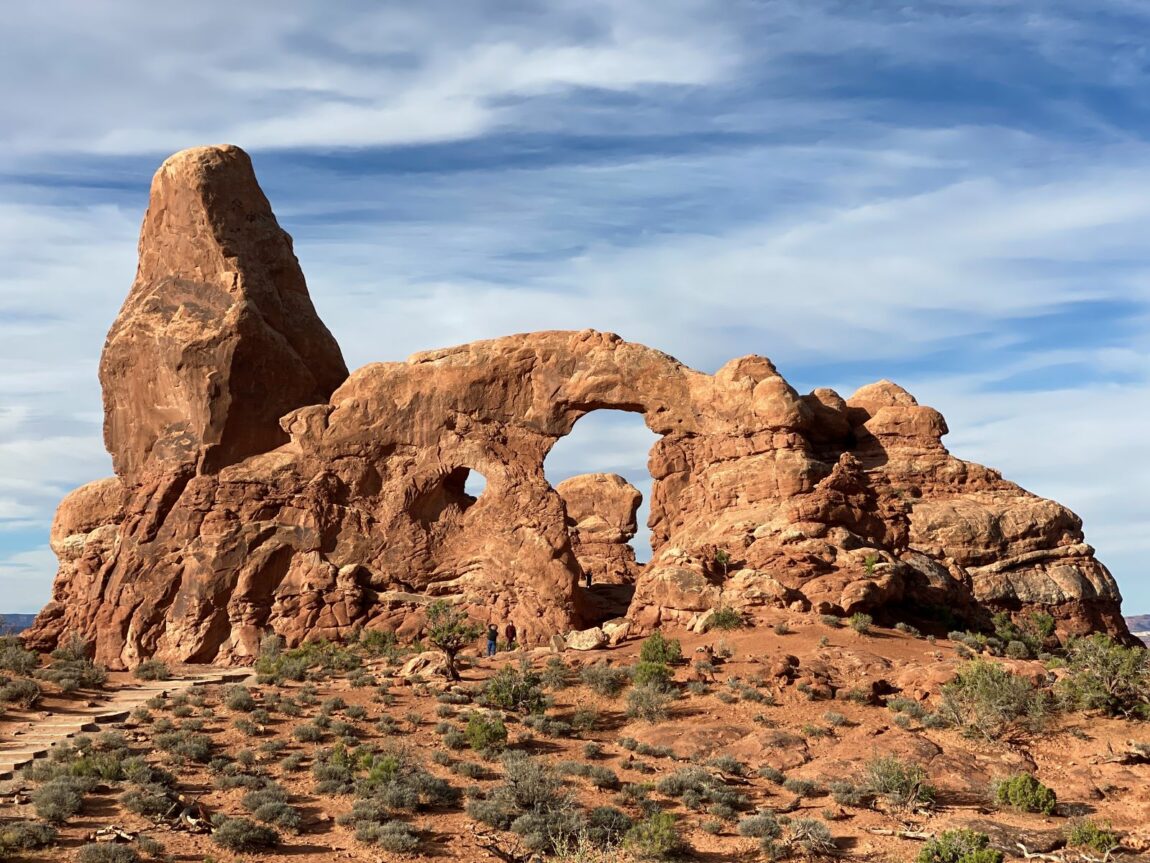
The Windows. Arches National Park. Credit: Carolina Valenzuela

The Windows in Arches National Park: Hiking tips, trail info, and best photo spots

The Windows in Arches National Park: Check out tips, best photography spots, and useful trail information for an unforgettable hike.

When visiting Arches National Park, The Windows section is a must-see as it is among the most scenic locations of the park and has a large concentration -all within a 2-mile radius – of photogenic arches and rock formations. These include The North and South Windows, Turret Arch, and Double Arch to name a few.

The Windows (sometimes called The Spectacles because of their close resemblance to a pair of glasses) are formed from the same local sandstone found around the park and offer great hiking, photography and stargazing opportunities.

Tip: The trail to visit The Windows and Turret Arch is 1-mile roundtrip (1.6 kms) and it can take you between 30-60 minutes.

Getting to The Windows is really easy: You need to drive a bit more than 9.2 miles up from the park’s entrance, then take the first right after Balanced Rock and follow this road for 2.7 miles.

Remember this is the one of the busiest National Parks; the parking lot can get really crowded as The Windows is a very popular destination within Arches. Therefore, head to The Windows early or alternatively park in the Double Arch parking lot where you will have a greater chance of finding parking.

The first 100 yards of The Windows trail is flat, but the rest includes stone steps, uneven surfaces, and elevation gain. However, don’t get discouraged – it’s not difficult at all.

Tip: Bathrooms are available at The Windows parking, but this is the extent of the amenities. Bring your own water – especially if it’s a hot day. We recommend bringing the Nomader Collapsible Water Bottle and fill it in at the hotel before heading to Arches.

The Windows. Arches National Park, Moab, Utah. Credit: Carolina Valenzuela

Other things you can do:

Photograph Turret Arch from the North Window: If you are feeling adventurous, photograph Turret Arch from the frame provided by the North Window.

The trail was a bit scary for me, but it will give you a chance to have a unique picture of Turret Arch.

Turret Arch from the North Window. Arches National Park. Credit: Christian Bergara

Hike the Double Arch trail: Located a short walking distance from The Windows, Double Arch takes it name because it’s composed of two arches that share the same foundation. The Double Arch trail is short and easy and there is hardly any elevation. The total roundtrip distance is 0.5 miles (0.8 kms).

Tip: The best time to photograph Double Arch is in the morning.

The larger opening has a span of roughly 144 feet (49 meters) which is the third longest in the park and a height of 112 feet (33 meters) – the highest in Arches.

Throughout the years, Double Arch (not to be confused with the Double O Arch) had many names, inlcuding Double Windows, Twinbow Bridges, and the Jug Handles (my favorite!). You’ll see lots of people have fun climbing up the rocks located below the arch, and of course do not forget to photograph this amazing arch from underneath.

Time needed: 15-30 minutes

Double Arch. Arches National Park. Credit: Carolina Valenzuela

Tip: Bring comfortable shoes for your visit to Arches. You will need them if you are planning to go hiking. We recommend The North Face Men’s Ultra 109 Waterproof Trail Shoe for men and the Salomon OUTline GTX Mid Women’s Hiking Shoes for women.

Head to Turret Arch: Located southwest of The Windows, you’ll find Turret Arch – a relatively young arch with a rock formation that resembles a tower. One of the most impressive features, other than its height, is that the fin where this arch is carving away is over 100 feet wide. There is also a smaller arch which can be found directly to the right of Turret Arch. Turret Arch is known as a great spot to watch the sunrise, so make sure to experience this stunning event.

Turret Arch. Arches National Park. Credit: Carolina Valezuela

Look for the Parade of Elephants: If you look South from Double Arch, you will notice a lone section of sandstone. Amazingly, these rock formations resemble a herd of elephants holding each other’s tails. Do not miss the opportunity to take this picture.

Parade of elephants, Arches National Park. Credit: Carolina Valenzuela

We are part of several affiliate programs including Viator and Amazon which means that we will earn a small commission at no extra cost to you if you make a purchase through the links included in this post.

Delicate Arch from the Twisted Doughnut. Arches National Park. Credit: Carolina Valenzuela

Delicate Arch in Moab: Things you should know for an unforgettable hike

Delicate Arch in Moab: Learn where the best photo spots are, key facts and information about the trail, and tips to make this hike unforgettable.

Delicate Arch – sculpted by rain and the passage of eons – is the largest free-standing arch found in Arches National Park: the light opening of the arch is simply enormous in person, clocking in at 46 feet high and 32 feet wide. This is one of the most recognized geological features in the world, so it’s easy to see why people from all over come to Arches to take a peek at this amazing arch.

Formed from the surrounding Entrada Sandstone, Delicate Arch stands unsupported and engulfed within a large natural sandstone bowl which accentuates its grandeur; this arch is the iconic image of Arches National Park. You probably will recognize it immediately as it’s constantly used as the promotional image of the park. Don’t believe me? Take a look at a Utah license plate or any park social media.

Hiking to Delicate Arch is one of the top things to do when visiting Arches National Park in Moab, Utah so you shouldn’t miss it. There is a reason why out of the 2,000 arches found in the park, Delicate Arch is the most renowned.

How long does it take to walk to Delicate Arch?

The trail to Delicate Arch is 3 miles (4.8 kilometers) roundtrip, with a climb of 480 ft (146 m) and follows rocks formed 150 millions of years ago. The round trip to Delicate Arch will take you between 2-3 hours, but it depends on your level of fitness and also how long you will stop for pictures along the way.

Trail to Delicate Arch. Arches National Park. Credit: Carolina Valenzuela

Tip: The trail has no shade, some steep climbing, and exposure to drop-offs so make sure you come well-prepared to do this hike.

Is Delicate Arch a hard hike?

The National Park Service describes this hike as difficult. Even though 2-3 hours is not that long for a hike, hiking to Delicate Arch is more strenuous that you might expect. For us, it was quite hard as we had already walked a lot during our visit to Arches National Park, and not to mention we did this in the afternoon after a morning of hiking, so we were tired even before starting this hike.

If your fitness level is average, you will be fine and might only need to take a couple of breaks in between. We witnessed a vast range of age and fitness levels throughout the hike – keep in mind to do the trail at your own pace. Don’t let the fact that the hike is marked as strenuous discourage you from visiting Delicate Arch – the tiredness and soreness you might experience afterwards is totally worth it.

How do you get to the trailhead?

To get to the trail, you need to drive 11.7 miles north into the park on the main road until you see the right-hand turn to Delicate Arch and Wolfe Ranch. After turning right, drive for 1.2 miles until you reach the parking area on your left.

Remember this is the most popular arch in the park; this trail can get very busy so the parking lot can fill in quickly. Late afternoon, particular towards sunset, is the busiest time as it attracts photographers to capture the warm light on the arch – it also happens to be the best time of day to visit. If you have the appropriate camera equipment, you may want to take some night photos of the stars. Sunrise is also a great time to visit Delicate Arch as you will see the sun rise behind the arch. However, depending on when the sun rises, you might need to wake up really early.

If you can’t find parking, head to the Delicate Arch Viewpoint parking lot. However, by parking here your hiking distance will significantly increase.

Tip: There are bathrooms at the start of the trail, but no drinking water is available – make sure you bring your own, you’ll definitely need it along the way.

After parking your car, you will walk past the Wolfe Cabin following an easy walk. Here John Wesley Wolfe and his son Fred settled on the banks of Salt Wash around 1898. Close to the cabin you can also check out pictographs, ancient rock art, created by the Ute people, depicting a hunting scene from the 1700s.

Tip: There is no shade in this trial here so be mindful at what time of the day you decide to head to Delicate Arch. It could get unbearably hot in the summer months.

After passing the Wolfe Cabin, the trail climbs rolling hills and you will start a steep ascent. This is the hardest part of the trail as it seems that you never get to the top of the hills. Don’t worry about getting lost, just follow the hundreds of people hiking this trail along with you.

Trail to Delicate Arch. Arches National Park. Credit: Carolina Valenzuela

Once you reach the top, the trail will level out to a narrow rock ledge with exposure to some pretty cool heights. Keep an eye open for a small opening -called the Twisted Doughnut – which will give you a first glimpse of delicate arch, and a lowkey awesome photo opportunity as it provides a great frame for Delicate Arch.

Delicate Arch from the Twisted Doughnut. Arches National Park. Credit: Carolina Valenzuela

Once you turn to the right you will see the amazing Delicate Arch surrounded by a sandstone “bowl”. Walk close to the arch, have your photo taken under it and photograph Delicate Arch from different angles along the bowl – don’t just take the “typical” photo. Also, don’t take pictures and leave; but rather take a seat to take in the magnificent landscape surrounding you. After we took all the pictures we wanted we sat and enjoyed the view for ages.

Delicate Arch. Arches National Park. Moab, Utah. Credit: Carolina Valenzuela

Can you see Delicate Arch without hiking?

If you can’t hike the Delicate Arch trial, don’t worry, you can still see it from a distance. The lower Delicate Arch viewpoint is an easy 5-minute walk where you can see Delicate Arch from .75 mile (1.2 kms) away. The upper trail allows you to take a closer look of Delicate Arch from a different angle. It is a longer and moderately strenuous trail which climbs steeply 0.5 mile (0.8 km). Winter Camp Wash – a canyon- separates this area from the arch.

Read blog: Devils Garden Trail in Arches National Park: The best hike in the park

What should you bring along?

Sunscreen: As mentioned earlier, there will not be any shade during the trail to Delicate Arch. Therefore, make sure you protect your skin by wearing a good sunscreen. You already know that I am a fan of Supergoop! a lightweight sunscreen that doesn’t clog your pores. Apply Coppertone on your body before the hike as well.

Hat: In addition to making sure you are applying sunscreen, bring along a hat. I personally love The North Face Norm Hat which comes in a variety of colors to choose from.

Water bottle: Trust me, you will get really thirsty during this hike -especially during the hot summer months- so make sure you are well-hydrated. The Nomader Collapsible Water Bottle rolls up for compact travel so it’s a perfect companion during hikes.

Comfortable sneakers: if you like to hike, Arches National Park will give you the opportunity to explore several trails. Make sure you bring along protective shoes – there is nothing more uncomfortable than having to walk for miles with blisters in your feet. We recommend The North Face Trail Escape Edge for men and The North Face Women’s Hedgehog Fastpack for women.

We are part of several affiliate programs including Viator and Amazon which means that we will earn a small commission at no extra cost to you if you make a purchase through the links included in this post.

Turret Arch. Arches National Park. Credit: Carolina Valezuela

Top things to do at Arches National Park, Utah

In this post, we share the top things to do at Arches National Park, and some tips to keep in mind while planning your trip.

For our first visit to Utah, we decided to check out Arches National Park – a stunning park located a few minutes from the town of Moab. Arches is one of the most popular parks in the US, drawing thousands of visitors from all over the world to see over 2,000 natural stone arches, and hundreds of rock fins and pinnacles.

Arches is perfect for both the experienced and weekend hikers, but photographers will be amazed by the park’s beauty as well. One of the coolest things about the park is that it is elevated, about 1,000+ feet, sitting on top of a mesa.

There are several things to do at Arches National Park, but we have compiled below a list of our favorite activities:

1-Take pictures

Landscape Arch in Arches National Park, Utah. Credit: Carolina Valenzuela

The views and rock formations found all over the park are marvelous, so don’t be surprised if you end up taking hundreds of pictures while visiting Arches – we took almost a 1000! Each arch, and even sections of the park, has an ideal time of day for photos; you should consider some of the arches are best photographed in the morning while others in the afternoon, depending on the angle of the sun. Below are some tips on when and where to take photos based on the time of day:

Arches best photographed in the morning: Pine Tree Arch; Tunnel Arch; Landscape Arch; Dark Angel; Three Gossips; Turret Arch; Double Arch.

Arches best photographed in the afternoon: Double O Arch; Park Avenue; Balanced Rock; Delicate Arch; The Windows.

2- Hike the Devils Garden Trail

IMG 4967 resized

This is the best hike in the park, as it allows you to see several of the park’s best arches along the trail. And remember, it’s not aways about arches in the park – this trail offers views of some of the coolest rock formations and breathtaking landscapes. However, the trail is more challenging than advertised and took us around 4 and half hours to complete.

There are some sections that seem easy, but they are not made for those who have knee or feet issues. We did see people of every age do the full hike, but there were spots where some simply could not continue due to the terrain and physical limitations. If you are doing this hike, be prepared for rock scrambling and steep exposures along the way.

The Devils Garden trail is located at the very end of the park’s road, about 18 miles north of the entrance, taking approximately 45 minutes by car. Head to this trail early in the morning: you won’t have trouble finding parking at this time and the morning light will help you take the best pictures. There is also little to no shade so avoid this trail during the peak sun hours or bring the right gear and sunscreen.

Read blog: Devils Garden Trail in Arches National Park: The best hike in the park


3-Drive the Arches Scenic Drive

Skyline Arch. Arches National Park. Credit: Carolina Valenzuela

The Arches Scenic Drive is a 19-mile road which will take your breath away; it’s an easy drive, with a smooth paved road, unlike other parks you won’t need a special vehicle. Be prepared to pull over frequently to take pictures as each rock formation along the road is more stunning than the next – if you go towards sunrise or sunset the formations will glow with a deep orange hue.

If you only have a half day at the park, you can drive the whole park road and spend a couple of minutes at each viewpoint. Note that there are several arches which are located a short walk away from the road, so if you are tired from the trails, this is an easy rest day and you can still experience the beauty of the park.

4- Head to Delicate Arch

Delicate Arch. Arches National Park. Credit: Carolina Valenzuela

This is the most popular arch in the entire park – people will take lots of time taking pictures, so have lots of patience for the perfect picture. This trail climbs 480 feet (146 m) so it’s a bit more challenging if you are combining this hike with the Devil Garden Trail in one day – like we did. It’s a tiring climb uphill, but we saw people of all ages along the way.

The view of Delicate Arch is amazing – especially during sunset. There are tons of photo spots that offer different angles for a unique picture, and one “donut hole” if you are brave enough to climb up the side of a nearby formation.

If for some reason you can’t do this hike, don’t worry you can still see Delicate Arch by heading to two alternative viewpoints. The Lower Delicate Arch Viewpoint, located close to the parking lot, allows you to see the arch from one mile away; the Upper Viewpoint allows you to see it a bit closer, but you will need to walk for a little bit along the trail. While you are here, take the opportunity to visit Wolfe Ranch, which will show how early American settlers lived, and the nearby petroglyphs made by ancient members of the Utes.

5- Visit Park Avenue

Park Avenue. Arches National Park. Credit: Carolina Valenzuela

Reminiscent of the New York’s famed Park Avenue, this section of the park’s rock formations looks like skyscrapers. This hike can take you between 30-60 minutes to complete and is very easy to do. When you park your car, you’ll see a small landing over look and some steep stairs located to the left. We highly recommend you descend into the canyon, as the experience is breathtakingly beautiful. When you arrive at the bottom, you’ll feel tiny compared to the massive rock formations that will surround you, much like the skyscrapers in New York. Depending on the time of day, the shadows may cause problems to get the perfect picture.

6- Stargazing

My husband loves looking at the stars to identify the constellations…and this park is perfect for stargazing! There are several overlooks in the park with open views of the sky to get amazing vistas with the stars (and Milky Way) in the background; The Windows and Panorama Point are among the most popular spots.

7- Get stunned by Balanced Rock

Balanced Rock. Arches National Park. Credit: Carolina Valenzuela

Balanced Rock is on of those natural formations that will perplex you with its beauty. Located a short walk away from the main road, the paved trail is only 0.3 miles trail making it an easy 15-minute walk to complete. There are few words to describe this formation, and pictures do not do it justice; make sure you take the opportunity to walk around Balanced Rock for some stunning photographs. You can also go a bit off trail to explore, but the terrain is a bit rocky for sneakers.

8-Visit The Windows

The Windows. Arches National Park. Credit: Carolina Valenzuela

The Windows area (North and South) is a must when visiting Arches National Park and will allow you to see some of the park’s largest arches. The Windows are located a short walk away from two other cool arches – Turret Arch and Double O Arch – giving you plenty to visit when you are on this trail. We recommend you head to this section of the park early in the morning as the parking lot gets full very quickly.

The North Window Arch will give you a “frame” photograph of Turret Arch. I have to confess I was a bit scared to walk to the photo spot, as the path looked a bit dangerous to me. Thankfully my husband was brave (or dumb) enough to walk onto the ledge to take this picture.

9- Stop by Double Arch

Double Arch. Arches National Park. Credit: Carolina Valenzuela

While at The Windows, make sure you take the short walk over to Double Arch and stand underneath, one of the few arches where you can do so. There is a flat, easy trail that leads you to two massive arch spans. Many visitors will climb up for the view, but don’t look down the other way through the arch – my husband who rarely gets scared had a small panic attack looking down the sheer cliff on the other side. Before you leave, make sure to check out the parade of elephants – it’s amazing how the rock formations truly resemble elephants walking past visitors.

10 – Useful tips

Devils garden trail in Arches National Park, Utah. Credit: Carolina Valenzuela

  • The park gets really crowded and you’ll have to wait to enter the park, one time it took us 30 minutes, but we have heard it can take much longer. To avoid the long lines, head to Arches by 7:30 am at the latest.
  • If you are hiking, make sure you bring appropriate gear and plenty of water.
  • There is hardly any shade and it can get unbearably hot during the day, especially in summer – a hat and sunscreen are mandatory if you want to avoid a sunburn or mitigate sun poisoning.
  • There were several areas in the park where we didn’t have any cell phone coverage so don’t exclusively rely on your mobile phone for directions.
  • Small rock piles (called cairns) mark the routes. Therefore, don’t build your own or move the rocks around as it can be misleading for other hikers.

We are part of several affiliate programs including Amazon and Viator which means that we will earn a small commission at no extra cost to you if you make a purchase through the links included in this post.

Devils garden trail in Arches National Park, Utah. Credit: Carolina Valenzuela

Devils garden trail in Arches National Park: The best hike in the park

The Devils Garden Trail in Arches National Park offers visitors the chance to experience a one-of-a-kind park with several arches and amazing rock formations along the hike.

The Devils Garden Trail is hands down the best hike in Arches National Park so you definitely cannot miss it. Throughout the hike, you will encounter up close several arches, spires, and fins that will take your breath away. You’ll immediately notice the intense color spectrums that range from dark red to rusty hues, and as the sun hits, you’ll get vibrant, fiery oranges. Note that the pictures that are included in this post have not been Photoshopped. These amazing colors are all natural, just as we experienced them in person.

The Devils Garden Trail is located at the very end of the park road. It’s 18 miles north of Arches Visitor Center taking approximately 45 minutes pending stops and traffic (yes, traffic – Arches is one of the most visited parks in the US). Note that the parking lot of this trail can get packed very early in the morning, so plan accordingly. We recommend you arrive around 7:30 am so that you don’t have trouble finding parking. Additionally, in the morning the light will be best to take pictures of most of the arches.

Tip: The trail is quite challenging as it is a 7.9 miles (12.6 kms) hike and it involves steep exposures, uneven surfaces, along with a bit of rock scrambling. It took us around 4:30 hours to complete this trail. And yes, we were exhausted when we finally arrived back to our car.

The first part of the trail is really easy and quite flat. However, as you start hiking beyond the Landscape Arch, the trail gets more difficult, with some tricky footing. The good news is that you can turn around at any time and don’t need to hike the entire trail to enjoy some of the arches.

Distances

  • Landscape Arch and back: 1.9 miles (3.1 km)

  • Trails to Pine Tree and Tunnel Arches: Add 0.5 miles (0.8 km)
  • Double O Arch and back: 4.1 miles (6.6 km)
  • Trails to Navajo and Partition Arches: Add 0.8 miles (1.3 km)
  • Dark Angel and back via main trail: 4.9 miles (7.9 km)
  • Dark Angel; return via Primitive Trail: 6.6 miles (10.6 km)

Total distance: 7.9 miles (12.6 km)

The Devils Garden Trail

Once you park your car, head to the entrance of the trail. Here you will find bathrooms so make you sure you go if you need to since the hike ahead will take some time. The trailhead is well-marked with several signs letting you know what arch or landmark is coming next. The only part where we were a bit confused as to where we should go next is when we were hiking towards Double O Arch. We noticed that several people were lost as well as there were no clear signs as to where to go next. As with many trails in Moab, you’ll have to keep your eyes open for subtle signs such as cairns, or a very small sign post with an arrow head symbol.

Once you are on the trail, you first should take the spur to see two arches: Pine Tree Arch and Tunnel Arch which are located between the trailhead and Landscape Arch. This is a short detour well worth it as it’s only 0.5 miles round trip so really doable.

Arches National Park, Utah. Credit: Carolina Valenzuela

Tunnel Arch: While you can’t really get too close to the arch, it still deserves a picture, especially in the morning when the sun hits. If you are hiking this trail during the morning, you will get perfect lighting for photos. Continue to Pine Tree Arch.

Tunnel Arch. Arches National Park. Credit: Carolina Valenzuela
Tunnel Arch. Arches National Park, Utah. Credit: Carolina Valenzuela

Pine Tree Arch: This is a really nice arch that’s worth a quick visit. Again, the morning light will be perfect for a photo so don’t miss it. Retrace your steps and continue hiking to Landscape Arch.

Pine Tree Arch. Arches National Park. Credit: Carolina Valenzuela

Landscape Arch: The hike to Landscape Arch is quite easy as there haven’t been any significant elevation gain or huge ups and downs. In 1991, a 60-foot-long rock broke away from Landscape Arch’s right side causing massive rockfall; 180 tons of rocks were found on the ground. After this collapse, the trail which took visitors up and under the arch was closed and it remains closed today due to safety reasons.

Landscape Arch in Arches National Park, Utah. Credit: Carolina Valenzuela

Unfortunately, the eventual collapse of the arch is all too real, as the battle with gravity is always a losing one; so we should all take advantage and visit it before it’s too late. The best time to photograph this arch is in the early morning. You probably be tempted to take pictures of the arch as soon as you see it, however, you’ll find the best angles after a short walk down the trail.

Tip: Right after you see the Landscape Arch you’ll come up to a long sloping rock formation. In order to continue the hike you have to climb it and then go around. Hidden behind the formation is a small sign post, which is easily missed. This is one of the tougher parts of the trail and some visitors with balance issues did not continue; however, there were lots of young kids who were able to do this part easily.

Located one third of the way between Landscape Arch and Double O Arch you can make a short detour to visit two arches: Navajo Arch and Partition Arch. Adding these two arches to your hike will add 0.8 miles (1.3 km) but they are totally worth it. Partition Arch splits off Navajo’s arch trail. It doesn’t really matter which arch you visit first.

Navajo Arch: This arch looks more like a cave than an arch, and you can get “inside” for a cool view. When we visited it had rained the day before and there was water inside, forming a shallow pool, so we couldn’t really enjoy it. If you are pressed for time, this is the arch that I’d skip.

Navajo Arch, Arches National Park. Credit: Carolina Valenzuela

Partition Arch: This arch was among my favorites as it offers amazing views. The arch has two windows where you can enjoy one of the best views in the park. Take the opportunity to walk through the arch to the other side – you’ll walk through the massive window and enjoy the amazing landscape on the edge of the cliff giving you unexpected views.

Partition Arch. Arches National Park, Utah. Credit: Carolina Valenzuela

Tip: Before getting to Double O Arch you will see the “Black Arch Overlook”. Don’t forget to take a picture of this arch. You can’t get close to it but it provides a really nice photo that shouldn’t be missed.

Black Arch Overlook. Arches National Park. Credit: Carolina Valenzuela

Here is where the trail gets more challenging as you’ll have to climb up a rock formation (this time, it’s similar to a massive ramp). Be careful as there are narrow ledges with steep drop-offs as well as elevation gain, and the footing you’ll come across can be slippery. As the trail gets more challenging, it also gets more stunning – some of our favorite photos we took are from this part of the hike. Take some time to enjoy the amazing rock formations all around you. Here you will probably spend some time taking quite a few pictures.

Devils garden trail in Arches National Park, Utah. Credit: Carolina Valenzuela

Double O Arch: You’ll need to use your hands and feet to climb during parts of this trail, as this third path on a rock formation is awkward – it slants downwards, so you’ll need to keep your balance; a broad range of age and experience crossed this path, so you don’t need to be an expert to continue. Even though this part of the hike is challenging, we recommend that if you can, you do it as it offers amazing views all around. We had some issues photographing this arch as, by the time we reached this point, the light was not the best. It’s probably better to photograph this arch in the afternoon. From here continue hiking to Dark Angel.

Double O Arch ​in Arches National Park, Utah. Credit: Carolina Valenzuel
Double O Arch in Arches National Park, Utah. Credit: Carolina Valenzuela

Dark Angel: Dark Angel is a sandstone “tower” located 0.5 a mile to the northwest of Double O Arch. You don’t really have to go all the way to photograph it, as it looms over the landscape, so if you are feeling tired feel free to go back at any time. Once we reached Dark Angel, we turned back and retraced our steps to the beginning of the trail. Since it had rained the day before we were advised by a park ranger that we shouldn’t take the Primitive Trail as there were areas with dangerously high water.

Dark Angel. Arches National Park, Utah. Credit: Carolina Valenzuela

Not taking the primitive trail meant that we were not able to visit the Private Arch. Something to add to our to do list the next time that we are in Arches National Park!

Tip: Take advantage and take a picture of Double O Arch from behind as you walk towards Dark Angel.

What you should bring

Hiking shoes: Hiking shoes are an absolute must for this trail. Make sure they have good traction as you will be scrambling through rocks and part of the trail can be slippery.

North Face Trail Escape Edge: My husband wore these during the trip and was very happy with how well they functioned even through the harder parts of the trails. Note these are not waterproof, but we didn’t count for such intense rain in a desert…

North Face Women’s Hedgehog Fastpack: This waterproof hiking shoe should have been the shoe for this hike, but I left them at home. This trip stressed how important it is to bring an appropriate shoe – I wore the winter hiking boots I took to Patagonia, but it was the wrong shoe for this terrain.

Sunscreen: Since this hike will take you several hours and there will be hardly any shade make sure you wear sunscreen to avoid a sunburn. As always, I recommend Supergoop! for your face and Coppertone for your body. Bring the sunscreen with you and apply after a couple of hours.

Comfortable hiking socks: My husband swears by these ankle high socks and has always told me that they provide comfort and absorb moisture really well. The socks fit most mens sizes (from 6-12) and are also comfortable for some women. If you feel they won’t fit and need a second option, Merrell has a great pair for women.

We are part of several affiliate programs including Amazon and Viator which means that we will earn a small commission at no extra cost to you if you make a purchase through the links included in this post.

Secret Link