
Learn when you should visit the most famous arches to get the best pictures.
If you love photography, Arches National Park provides an amazing backdrop for pictures – it’s no wonder this is among America’s most popular national park. Arches, fins and spires will give you plenty of opportunities to make your camera work extra hard during your trip. Be ready to have some of nature’s most memorable landscapes captured forever on film.
How do you take pictures of Arches National Park?
If you always look for the “perfect” picture, note that the sun can be either your best friend or worst enemy, especially at this park. The sunlight can either help you take an amazing picture that captures the bright, fiery red and orange colors of the arches or totally ruin it. Therefore, there are specific times when you should visit the arches to use the sunlight to your advantage.
Below is a list of the most popular arches as well as some photography tips. Neither Christian nor I are professional photographers – we usually take pictures with our iPhones; which if you ask me, take amazing pictures. However, we hope these tips are beneficial and help you take the best photo possible. Keep in mind that the pictures on this blog have not been Photoshopped – the colors depicted are real!
Balanced Rock
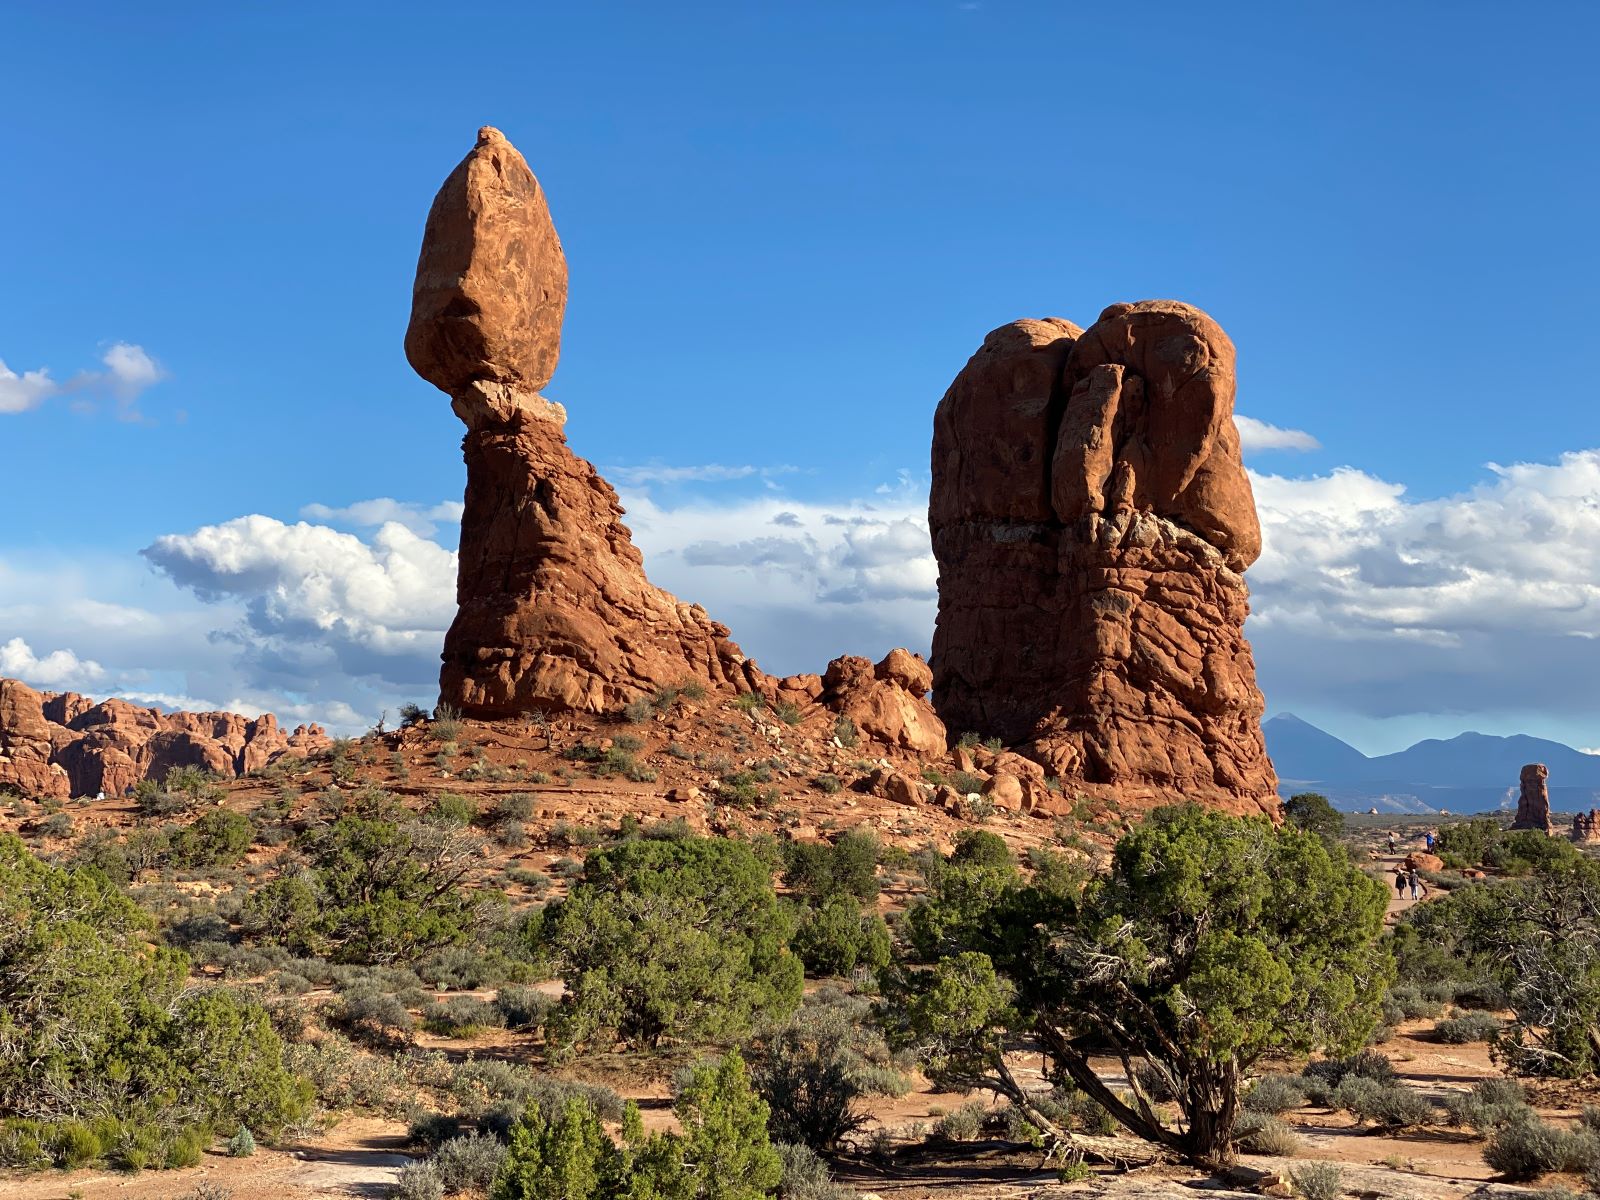
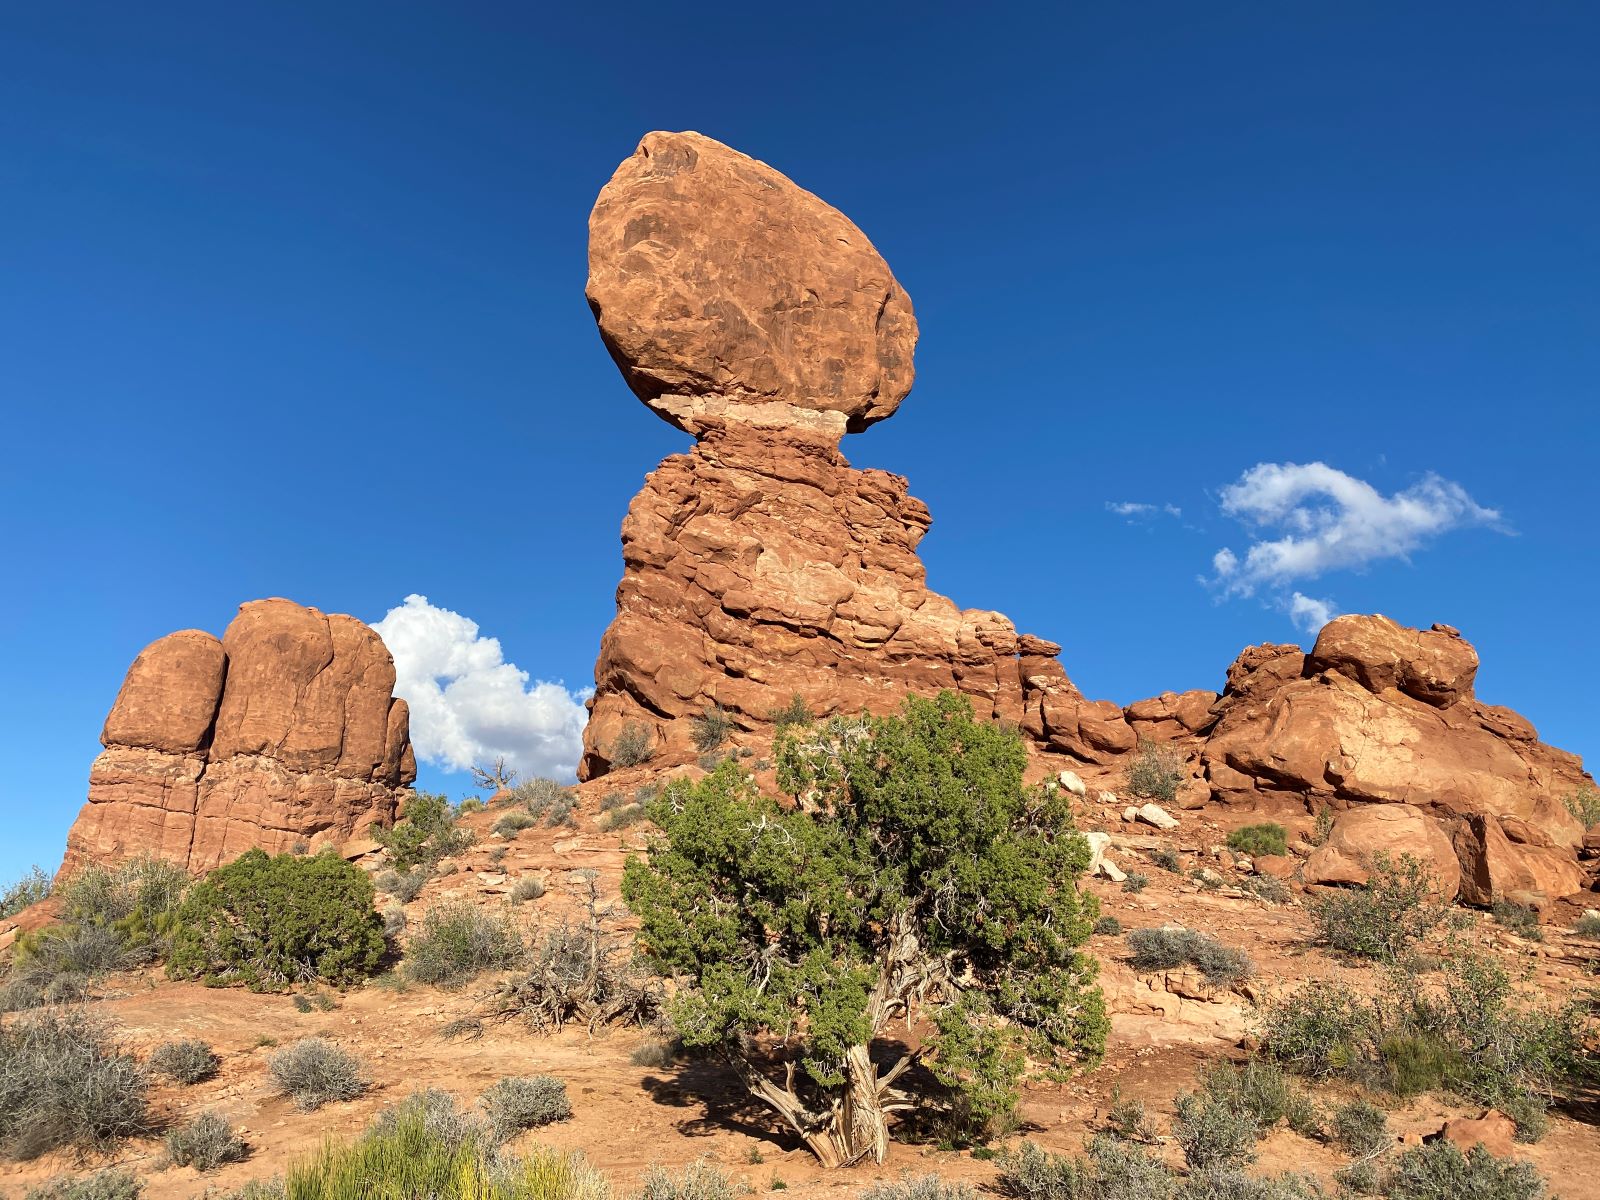
Balanced rock defies gravity. Located in an accessible and paved trail, visiting this arch is a must-do when in Arches. The total height of Balanced Rock is 128 feet (39 meters) and resting on a tiny sliver of rock which will eventually collapse with the passage of time.
The 0.3 miles trail (approximately a 15-minute walk) will take you around this amazing rock formation. Take this opportunity to capture Balanced Rock from different perspectives and angles as you walk on the trail. Note that climbing on Balanced Rock or its base is prohibited.
The best time to photograph Balanced Rock is in the afternoon.
Delicate Arch
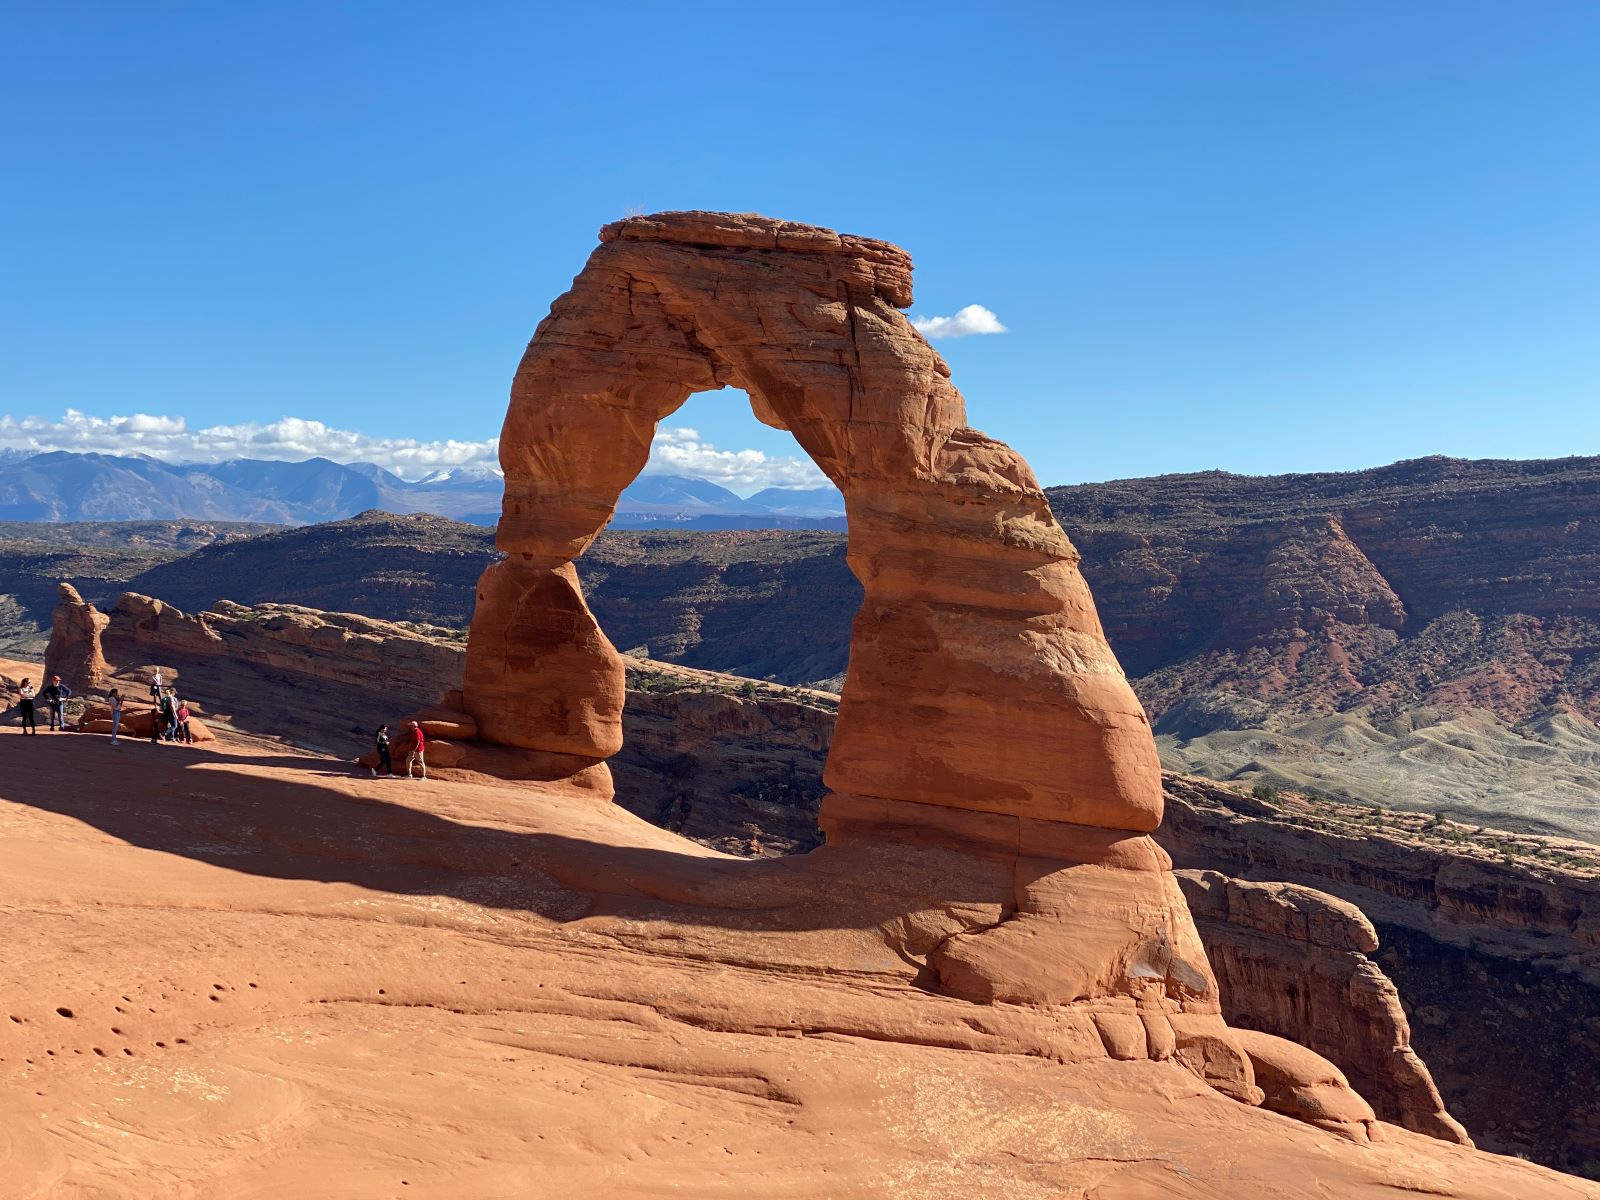
Delicate Arch is the most famous of the 2,000 arches in the park so you should definitely plan a visit. Unlike Balanced Rock, which is really easy to get to, Delicate Arch requires a bit more effort from your part.
Get ready to hike for 3 miles (4.8 kilometers) roundtrip and climb 480 ft (146 m). On average the hike to Delicate Arch can take you anytime between 2-3 hours.
During the afternoon, the sun will cast a warm light over the arch. Make sure to bring a headlamp with you to help you go back if it’s already dark. Sunrise is another popular time to visit Delicate Arch. However, you might need to wake up extremely early if you want to make it to the arch on time – plan accordingly.
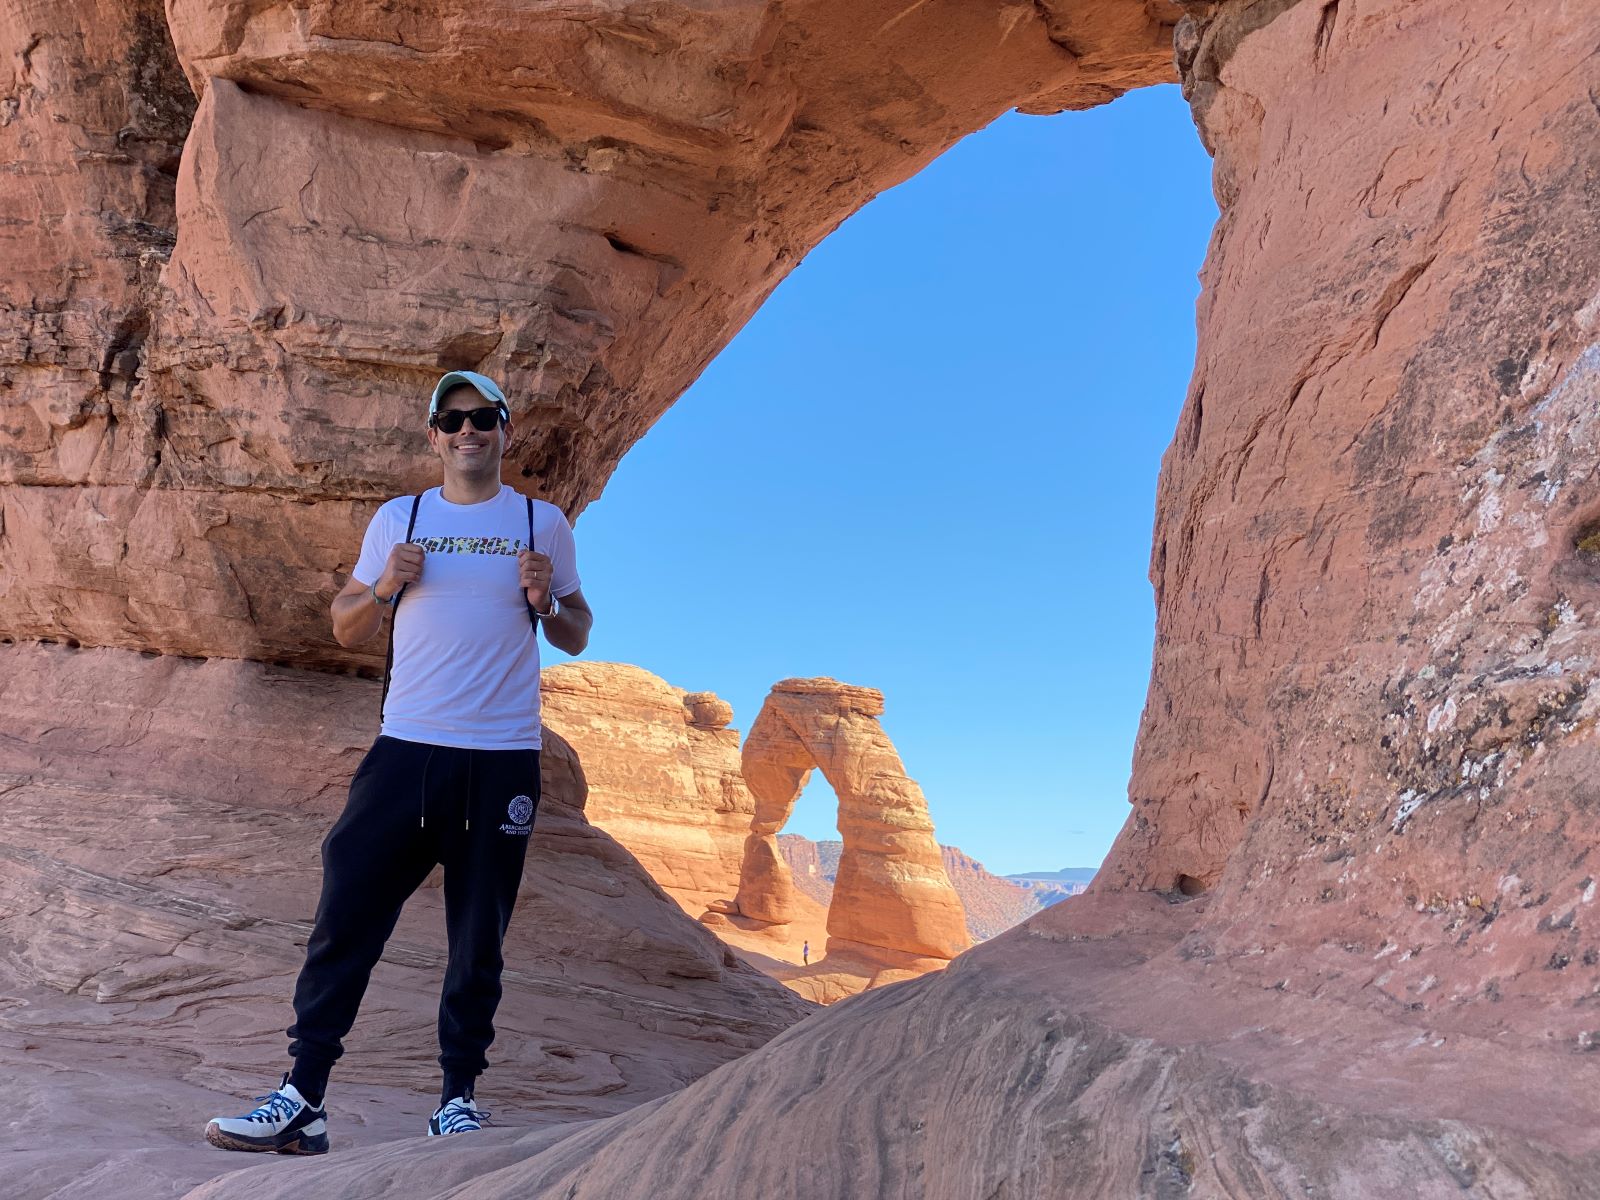
Just before turning right to encounter Delicate Arch look for an opening called the Twisted Doughnut. You will find it because there will be people next to it snapping pictures. The Twisted Doughnut gives you a perfect frame to photograph Delicate Arch so don’t miss this opportunity. Additionally, once you get to Delicate Arch, there are different angles to photograph it. Get close to it, go around, and take some time taking in the amazing scenery all around.
The best time to visit Delicate Arch is in the afternoon.
Read blog: Delicate Arch in Moab: Things you should know for an unforgettable hike
The Windows & Turret Arch
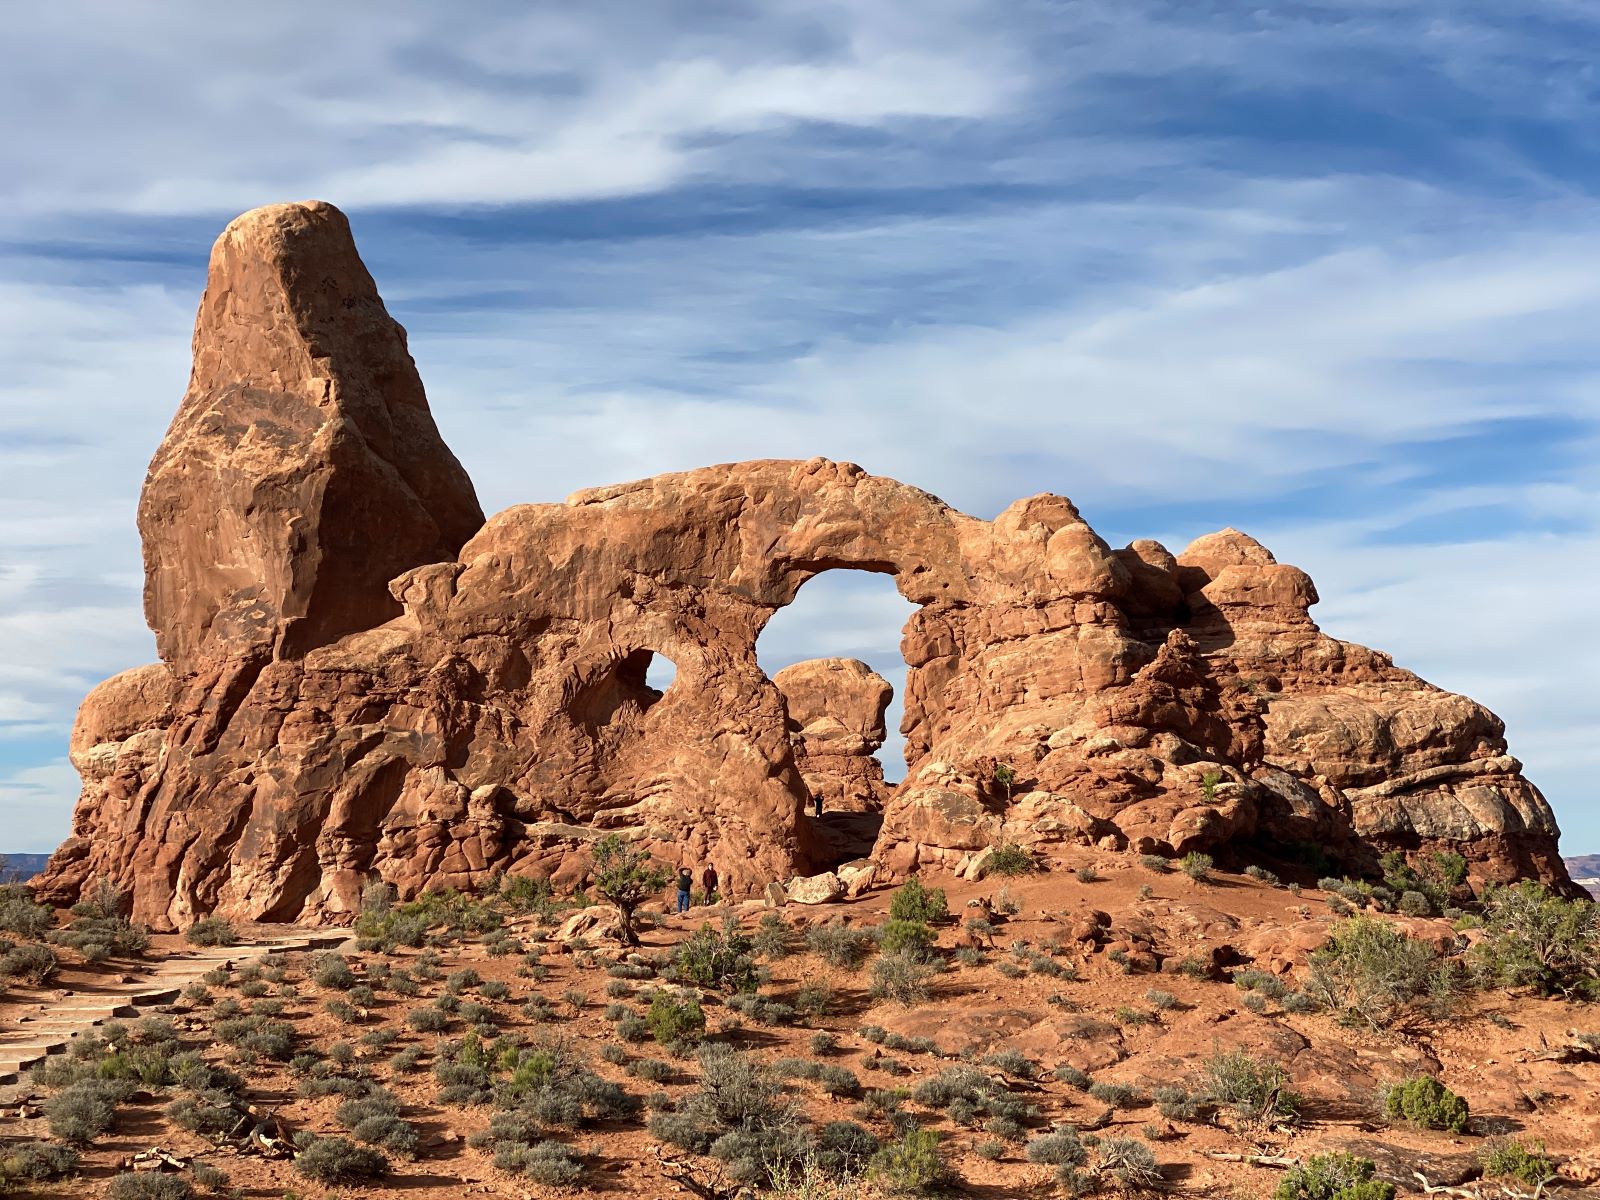
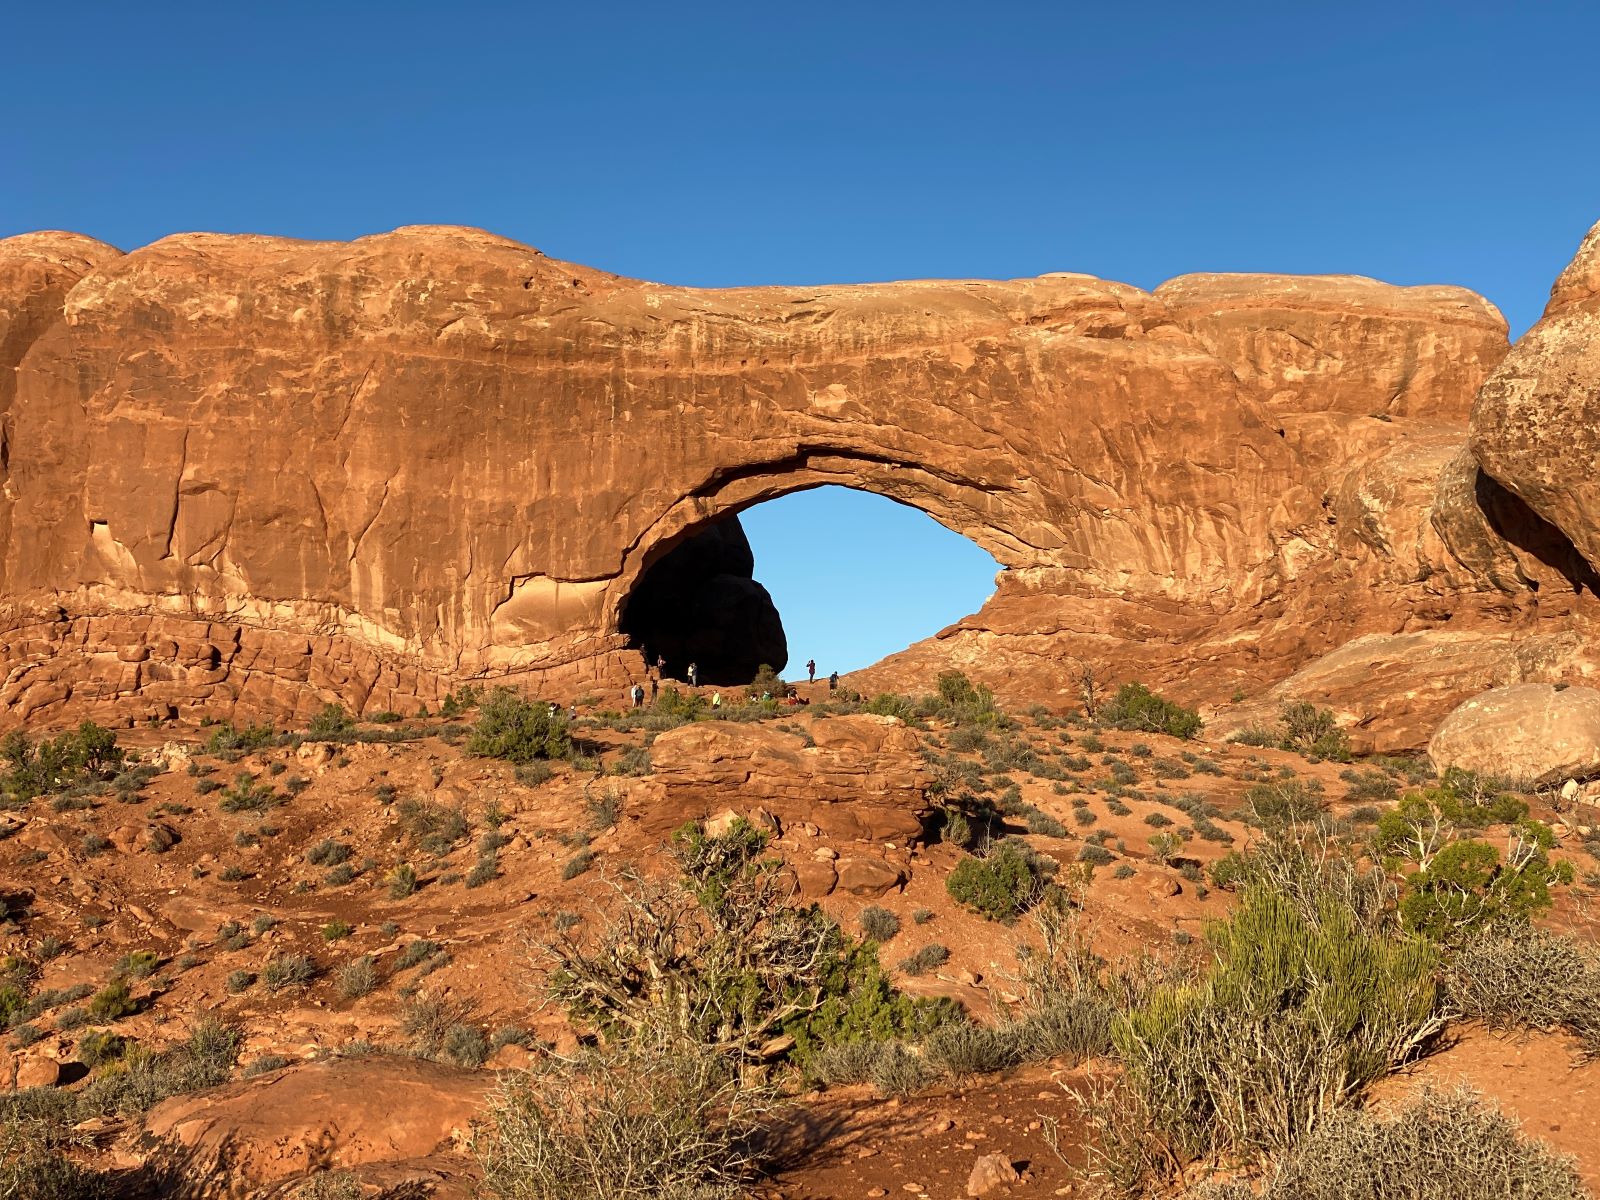
The Windows is considered among the most scenic locations in Arches National Park. The trail to The Windows and Turret Arch is 1-mile roundtrip (1.6 kms) and it can take you between 30-60 minutes.
When visiting the North Window, try photographing Turret Arch from the opening in this arch. Getting to this photo spot wasn’t easy for me as I got scared, but there were plenty of people photographing Turret Arch from here and seemingly had no issues at all. If you decide to head to this spot, be very careful.
The best time to photograph The Windows is during the afternoon, as the sun won’t give you much trouble.
Keep in mind this is a popular location and the parking lot might fill in faster than you’d expect.
The best time to photograph Turret Arch is during the morning – contrary to The Windows.
Therefore, if you want to take pictures without the sun casting bad lighting you should head to this location twice, both in the morning and afternoon.
Read blog: The Windows in Arches National Park: Hiking tips, trail info, and best photo spots
Double Arch
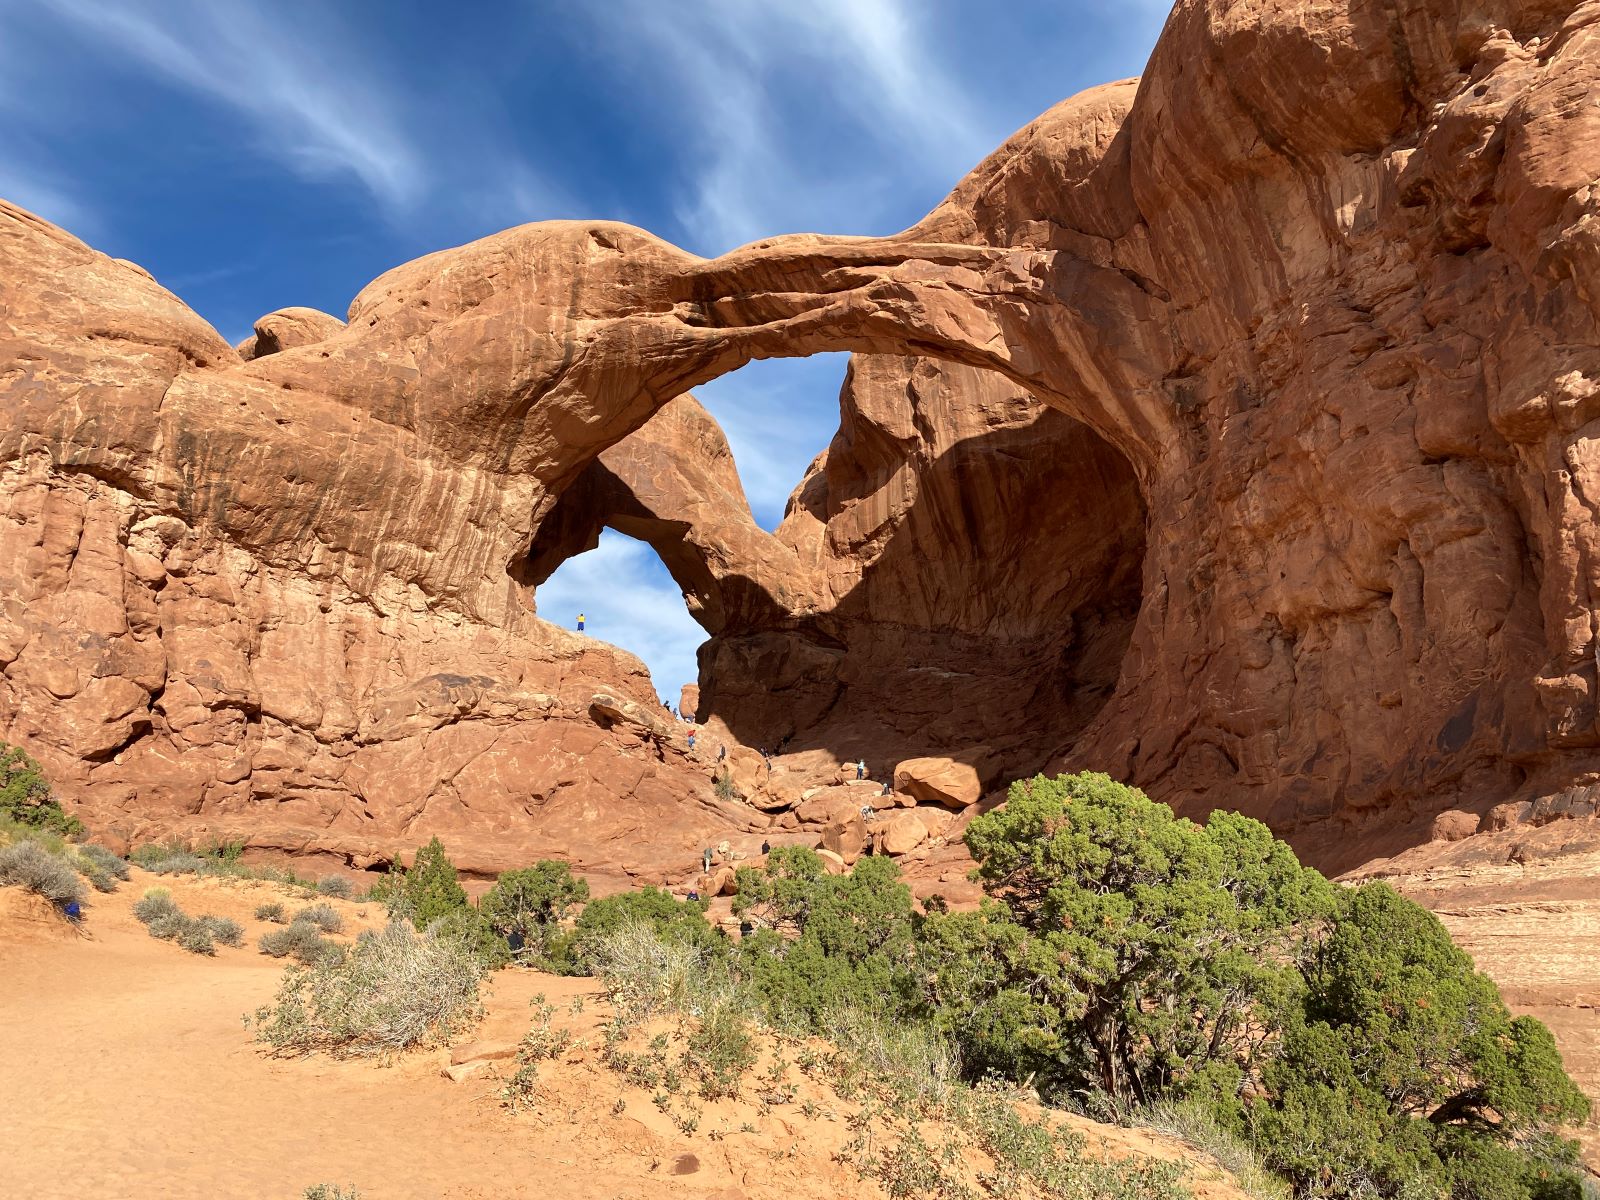
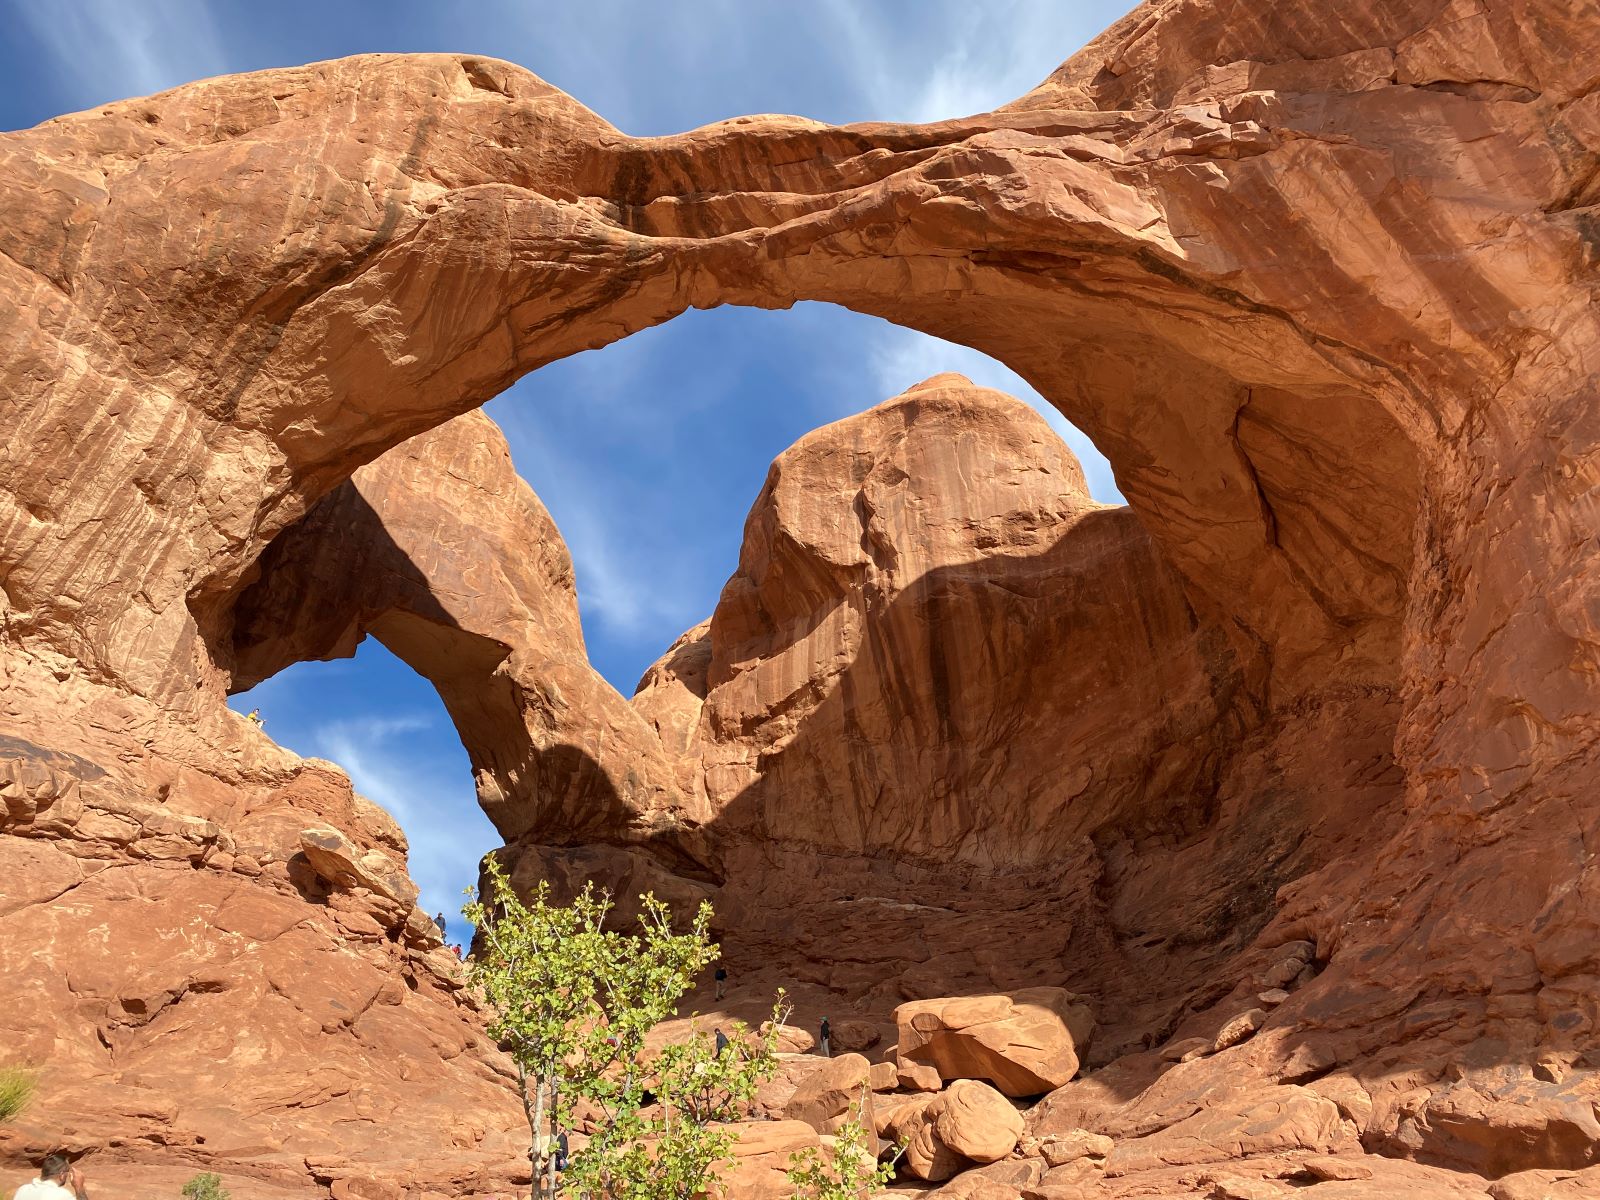
When visiting The Windows, make sure to head over to Double Arch since it’s located really close by. As you can probably guess by the name, Double Arch is composed of two arches that share the same foundation; giving you one of the most unique formations in the park.
The Double Arch trail is easy – no elevation and the total roundtrip distance is only 0.5 miles (0.8 kms). A piece of cake compared to the Delicate Arch trail.
This arch is a bit difficult to photograph as the shadows cast by its two arches pose a bit of a challenge. Make sure you do photograph it from below so you can capture the enormity of Double Arch; but there are other cool angles you’ll spot as well. The larger opening has a span of roughly 144 feet (49 meters), the third longest in the park and a height of 112 feet (33 meters), the highest in Arches.
The best time to photograph Double Arch is in the morning.
Devils Garden Trail Arches
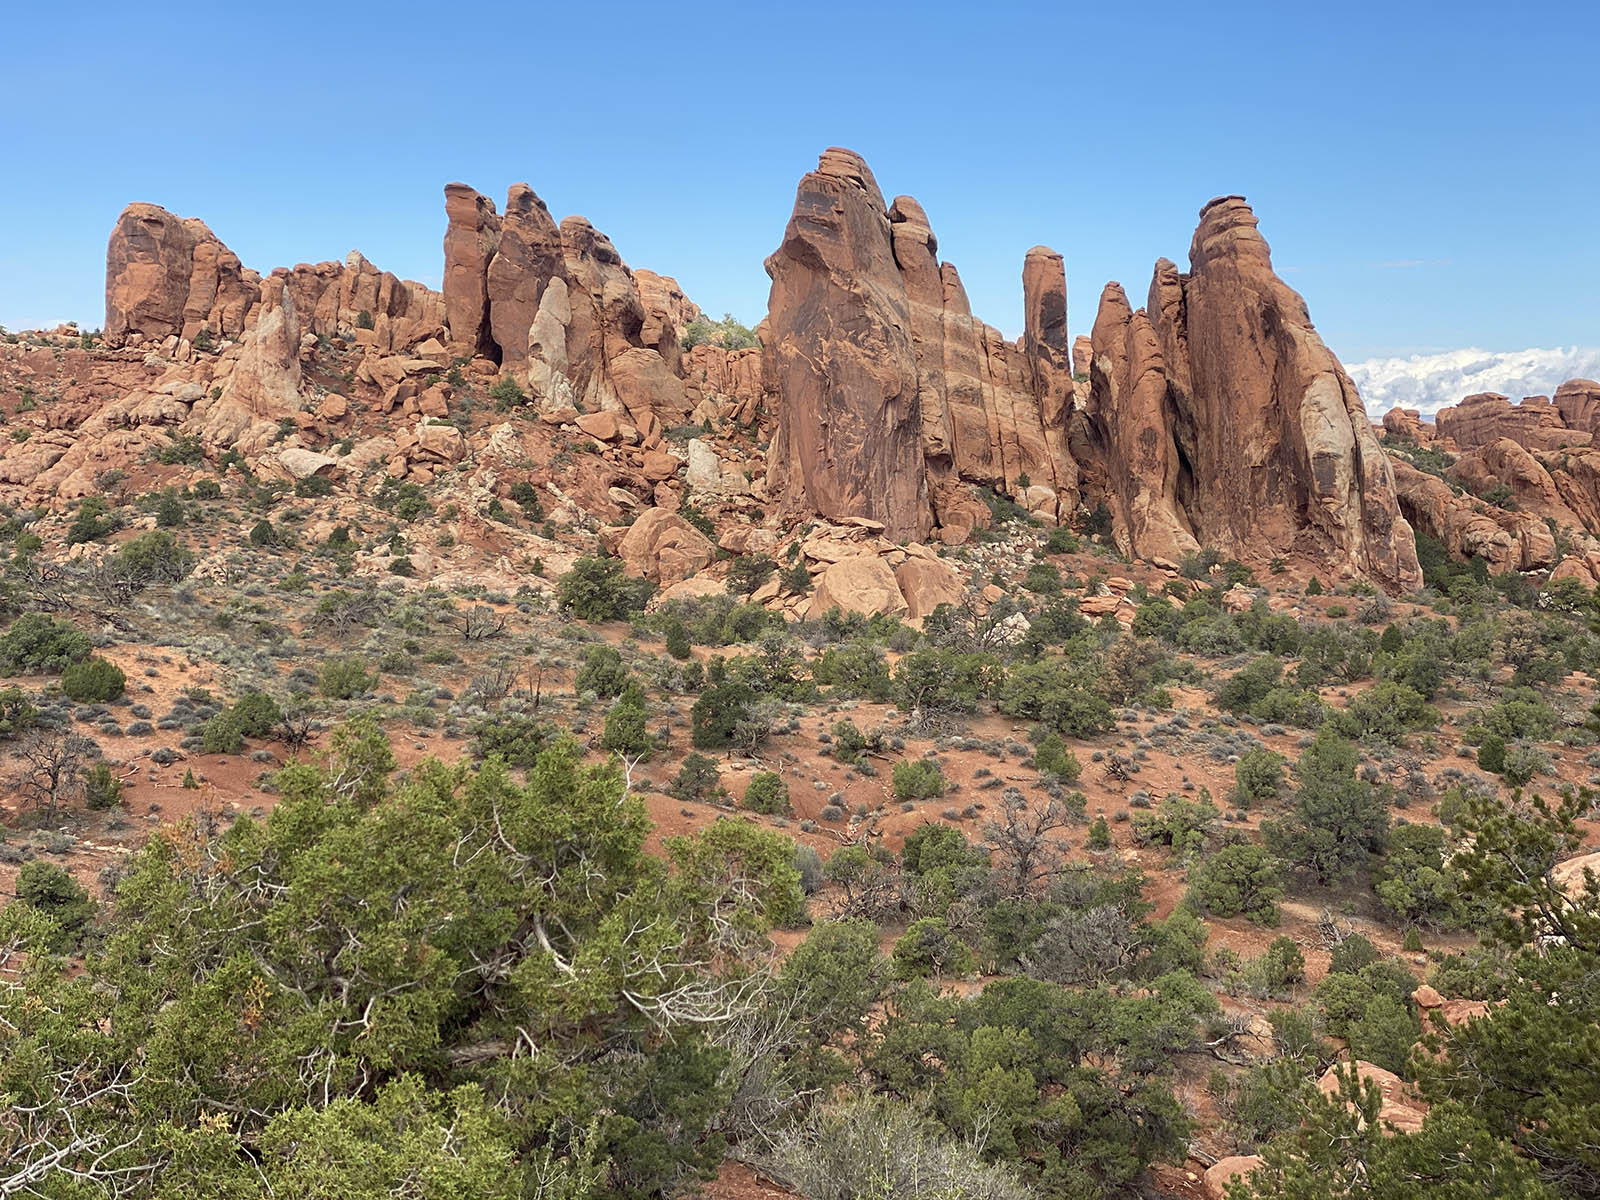
The Devils Garden Trail was my favorite in the whole park; it was also the most exhausting! To get to this trail, you’ll first need to drive 8 miles north of the entrance which takes approximately 45 minutes. Once you park, get ready for a long hike. The trail is 7.8 miles (12.6 kms) roundtrip and can take you 4:30 hours.
Because this trail is really long and you will probably do it only once, we recommend you visit it during the morning. And by morning, I mean really early. This is a very popular trail, and the parking lot might be full if you arrive mid-morning.
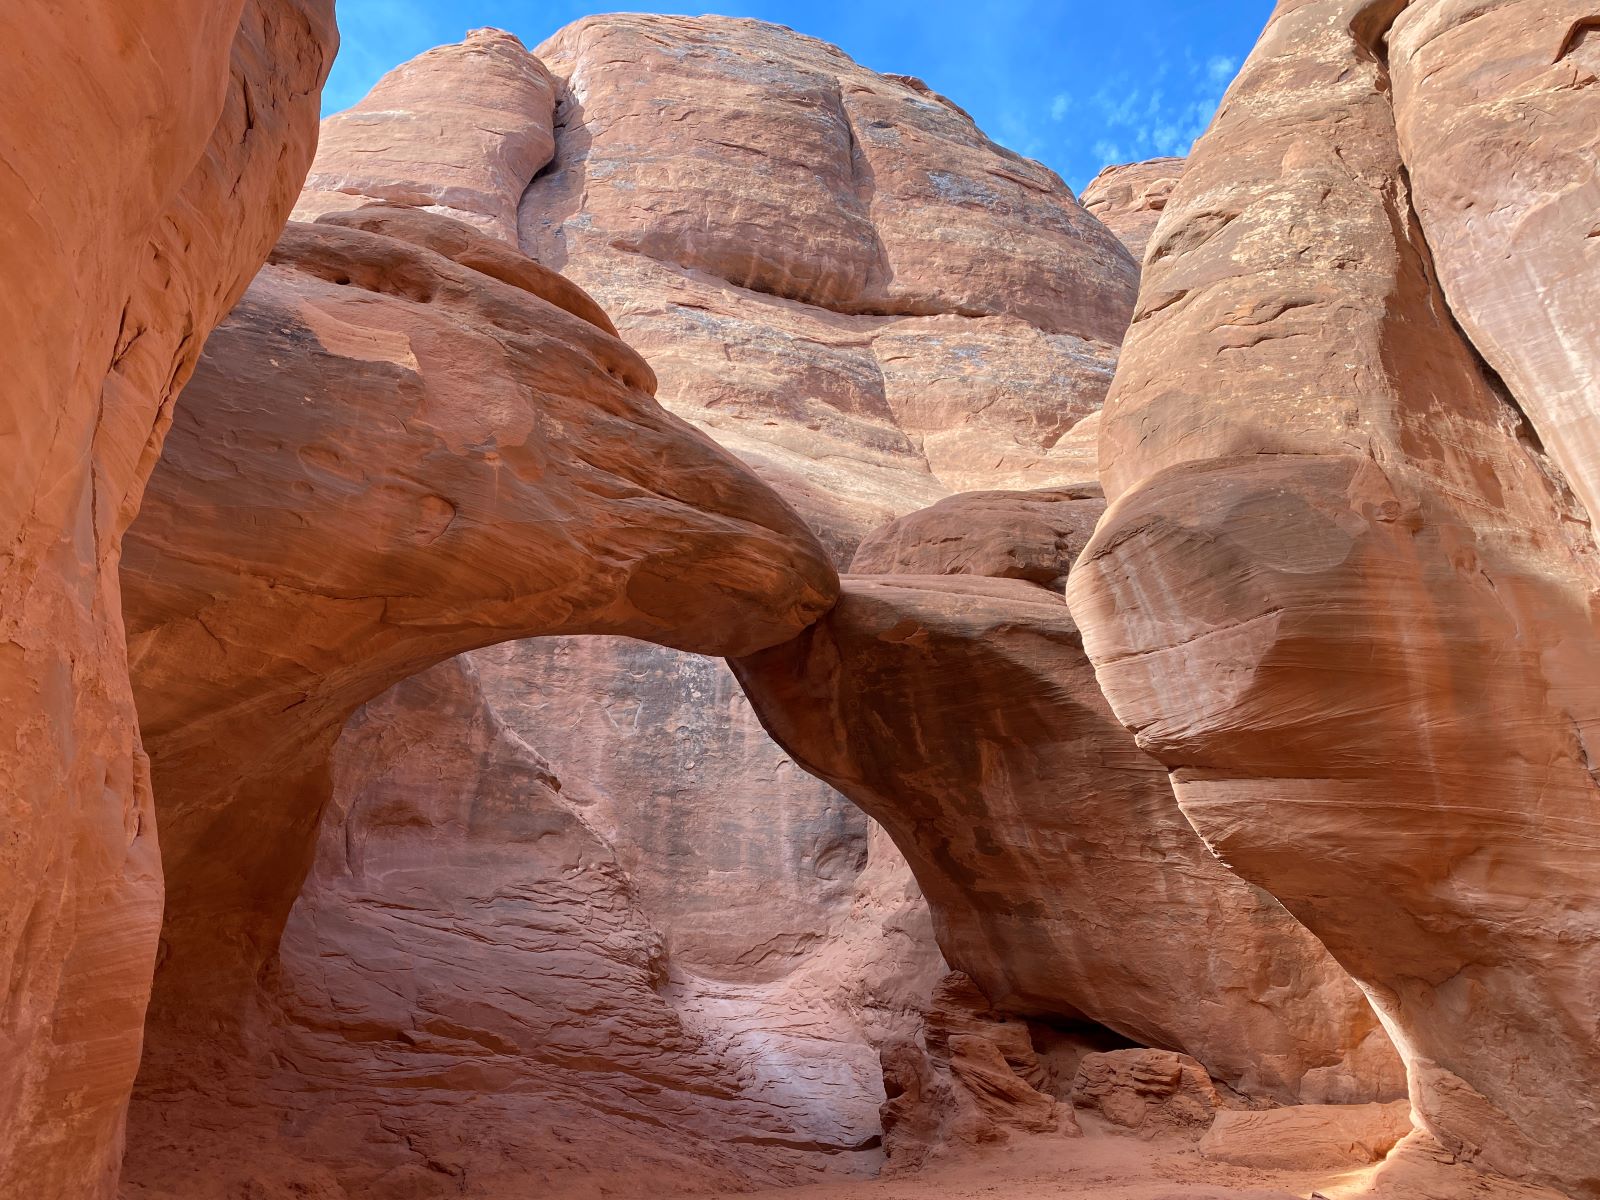
When you get to the trail, the first two arches you should visit are Pine Tree Arch and Tunnel Arch. To do this you’ll need to take short detour (0.5 miles roundtrip) which we highly recommend you do. When we did this part of the trail, we arrived with really good light for photographs. Make sure you “play” with the light as it makes a difference in capturing the bright color of the arches.
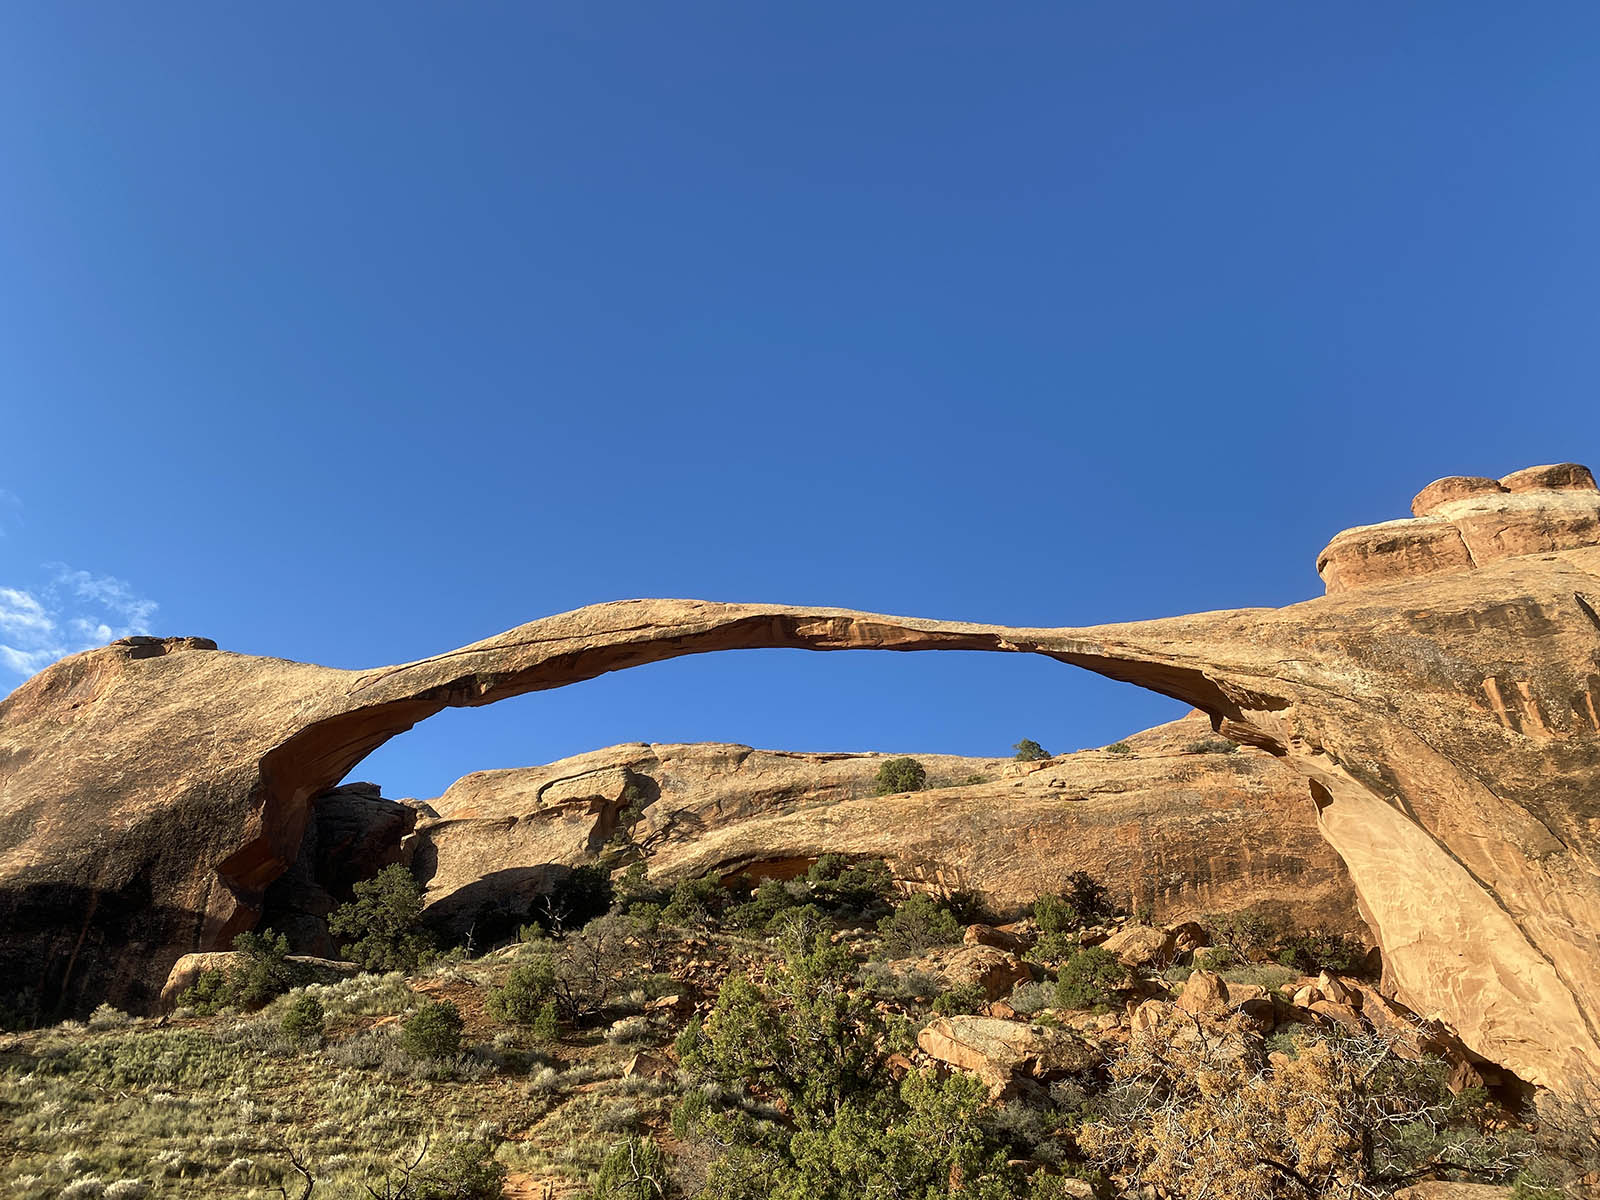
Next, head to Landscape Arch. This was among my favorite arches. Once you first see it, you will immediately want to snap a lot of pictures. However, as you get close to the arch you will notice that the opening is better captured as you continue walking on the trail.
Once you are done, take another detour to Navajo Arch and Partition Arch. This will add 0.8 miles (1.3 km). I wanted to photograph Navajo Arch’s opening from the inside – where I thought it would have looked more photogenic. Unfortunately, the sun ruined this picture. Partition Arch is stunningly beautiful; take advantage of the openings as picture frames.
The next section of the trail was, in my opinion, one of the most photogenic. With fins and spires protruding from almost everywhere, you’ll be able to take memorable photos. Keep walking until you get to Double O Arch. We had a lot of trouble photographing this arch because, again, of the sun. We took pictures from both sides but all of the pictures end up looking a bit “burned out”.
The last stop is Dark Angel, a sandstone “tower” located 0.5 a mile to the northwest of Double O Arch. If you are too tired (and remember you still have to walk back) don’t walk all the way to Dark Angel, you can still take a great picture from a distance.
Best time to visit the Devils Garden Trail is in the early morning.
Devils Garden Trail in Arches National Park: The best hike in the park
Sand Dune Arch

A secluded arch, Sand Dune is tucked among sandstone fins – half the fun is finding it. It’s only 0.3 miles roundtrip (0.5 km) so you can just stop here for a quick visit. When taking the picture, make sure you include a little bit of sky in the frame as it will make a good contrast with the color of the arch.
The best time to photograph Sand Dune Arch is in the morning.
Park Avenue
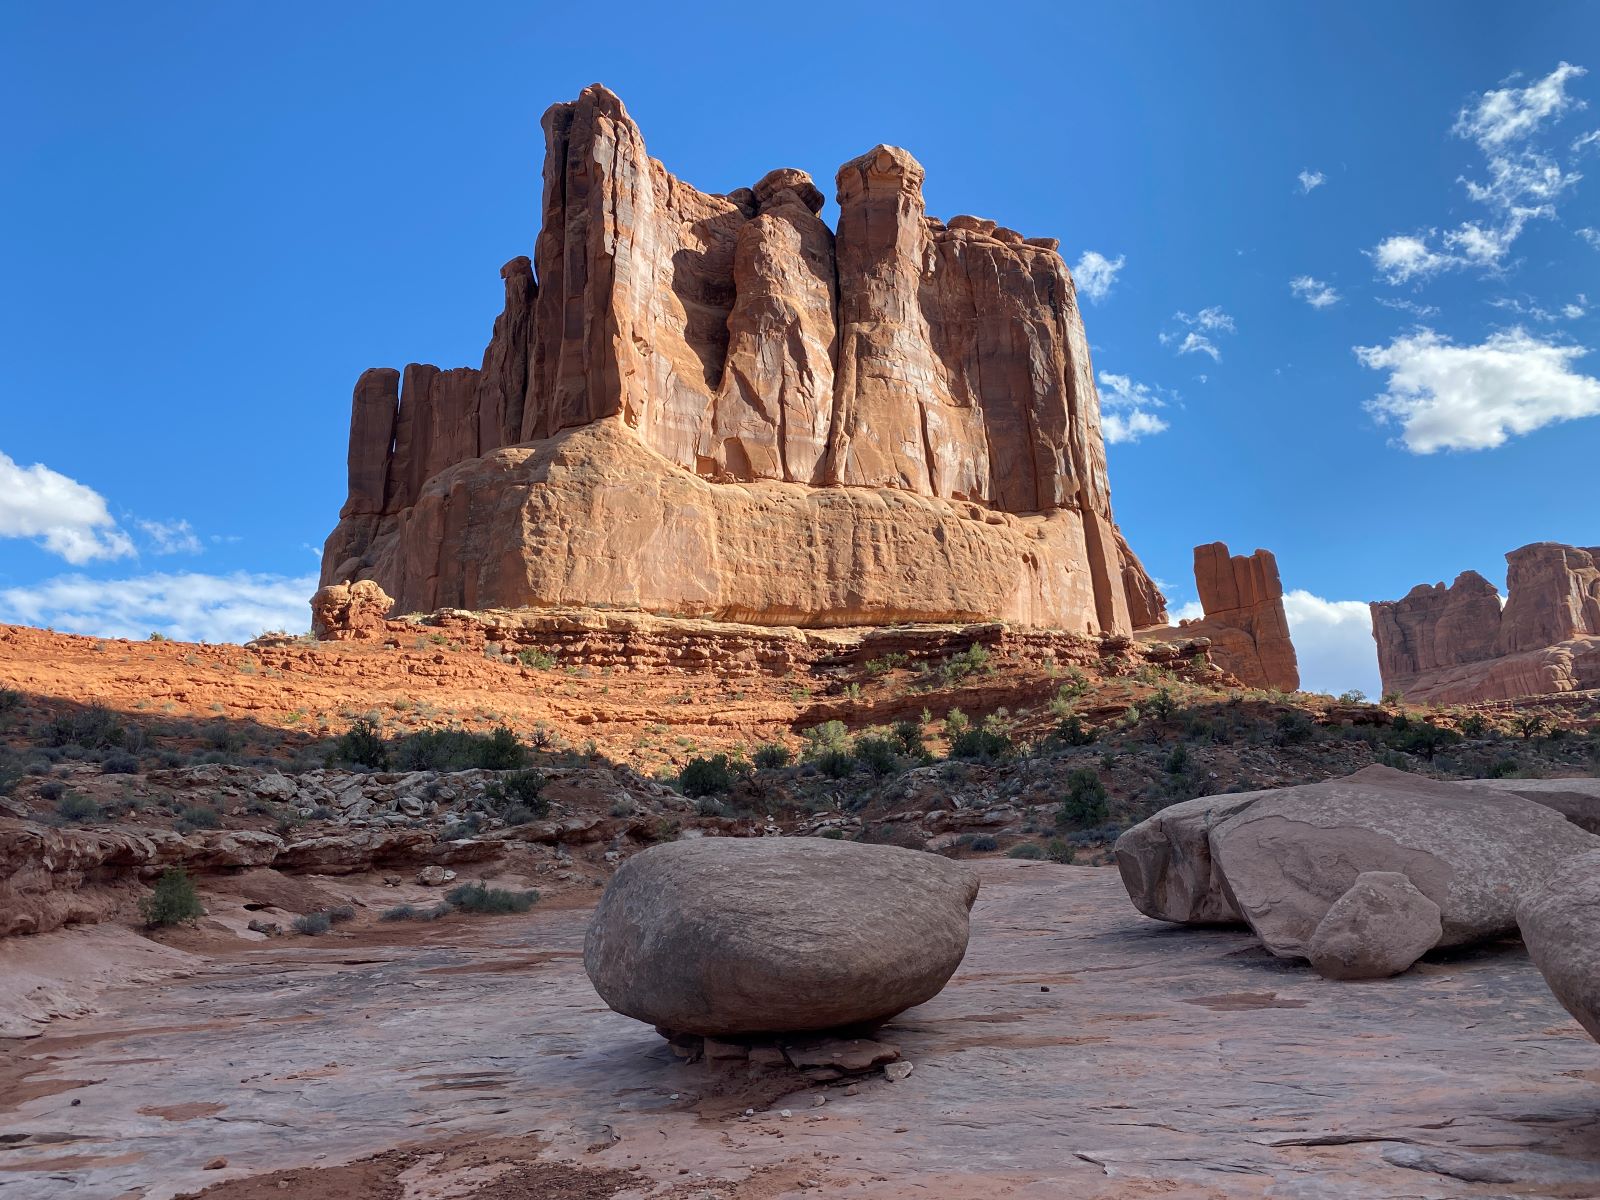
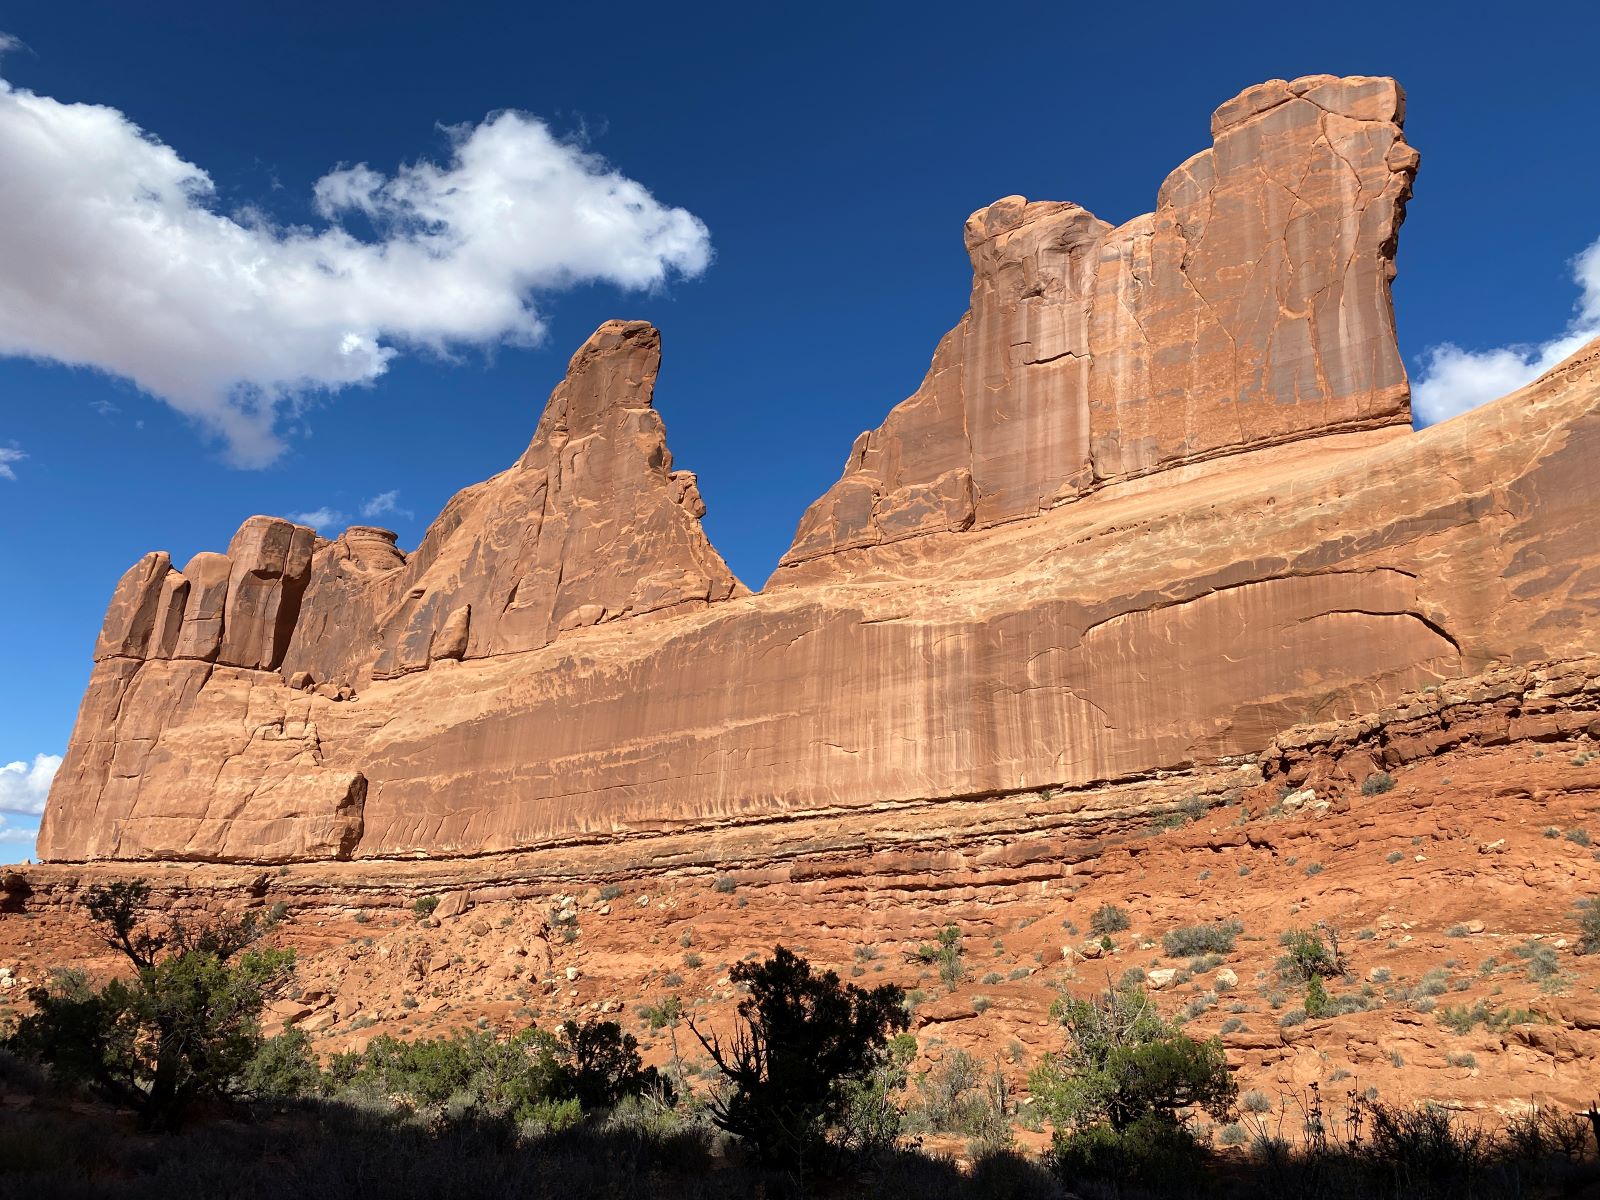
Park Avenue is a really nice one-mile trail (1.6 km) which leads to the Courthouse Towers. Park Avenue gives you the chance to follow the bottom of a canyon and enjoy marvelous views of fins, balanced rocks and monoliths. From this vantage point it really looks like you are surrounded by skyscrapers.
We found Park Avenue a bit difficult to photograph because of the shadows cast by the sun. However, be mindful that while you get great pictures towards one side the opposite side will make your photographs look a bit dark. Here you will be able to also photograph the Three Gossips and the Courthouse Towers. The Three Gossips are better photographed in the afternoon.
The best time to photograph Park Avenue is in the afternoon.
We are part of several affiliate programs including Viator and Amazon which means that we will earn a small commission at no extra cost to you if you make a purchase through the links included in this post.